![]()
|
|
CAUTION!! Always observe ESD precautions when handling the main PCB. While the main PCB is resistant to electrostatic discharge, the potential to damage electronic components still exists.
|
|
|
CAUTION!! Do not handle the main PCB without turning the machine off. While the voltage input to the PCB is only approximately 36 volts DC, handling the PCB will short the components out while the PCB is still energized and damage the PCB severely. |
Replace the main PCB only after electrical troubleshooting procedures have eliminated other components as the cause of machine failure or the main PCB is obviously defective. This procedure can be safely performed by the customer maintenance personnel as long as required precautions are observed. Before replacing the Main PCB, it is strongly recommended that the situation be discussed with Melco Technical Support as other causes may cause machine failure that looks like a Main PCB fault when it really might be an electrical short in a harness, a software corruption issue, or the like.

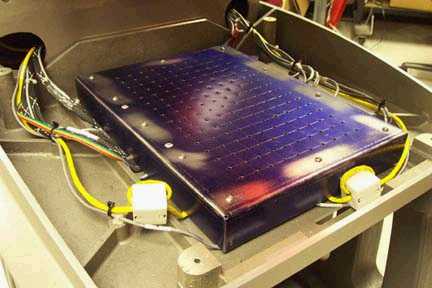
Figure 1 - Main PCB Installed
Replacement Parts Required:
Main PCB
|
|
CAUTION!! There must always be thermal pads installed on the four flat pad supports that are located underneath the Main PCB. If these are removed or not installed, the Main PCB will short out and components will burn out. The pads do not need to be replaced unless they are damaged or removed for some reason.
|
Replacement Procedures:
1. Turn the machine OFF.
2. Let the machine sit without touching the PCB and place your hand somewhere on the machine body (not the Main PCB) to dissipate any residual static in the machine or your body.
|
|
CAUTION!! Use extreme care not to drop metallic objects, tools, or other conductive material on the Main PCB when you have the base cover removed. If you drop such objects on the Main PCB, it can severely damage the electronics which will be very expensive to repair. |
3. Remove the base cover from the machine.
|
|
CAUTION!! Before installing the EMI cover, ensure there is enough slack on all of the harnesses underneath the cover to prevent pinching the harnesses or pulling the connectors loose when the EMI cover is installed. DO NOT force the EMI cover down onto the harnesses. |
|
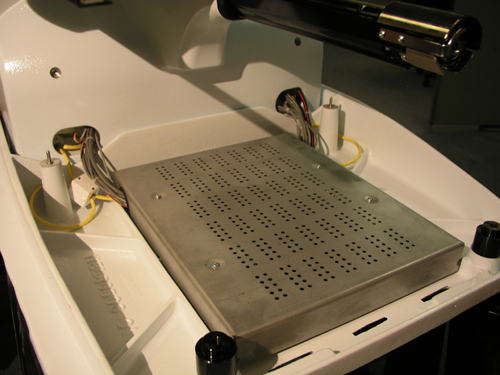
Figure 2a - 32188 Series EMI Cover |
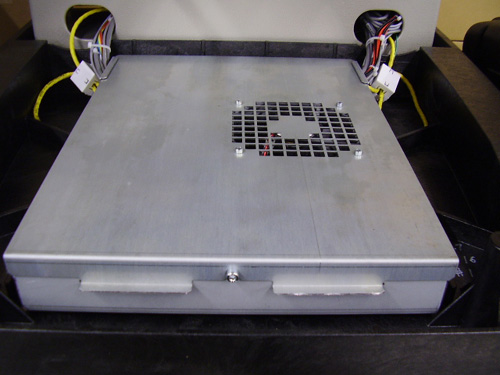
Figure 2b - 32232 Series EMI Cover |
|
Figure 2c - 33322 Series EMI Cover
|
|
4. Remove the EMI cover by removing the screws from the edge of the cover. For removal of 33322 Series EMI cover refer to Removal of the EMI Cover - 33322 Series.
5. One at a time disconnect all of the harnesses from the Main PCB and leave the connector in close proximity to the connector socket where you removed it from.
6. Remove the M4 X 8mm flanged socket head screws mounting the Main PCB to the machine base.
7. Remove the Main PCB from the base handling it only by the edges (especially if it is going to be sent to Melco Quality Assurance for failure analysis).
8. Place the old Main PCB in a protective anti-static bag.
9. Remove the replacement Main PCB from the protective anti-static bag it was shipped in, handling it only by the edges and place it in position on the machine base.
10. Install the M4 X 8mm flanged socket head screws and tighten the screws to minimum Melco Torque Specifications (only enough to secure the Main PCB in position).
11. One at a time, connect all of the harnesses to their corresponding sockets on the Main PCB.
12. Replace the EMI cover carefully following the procedures provided in "EMI Cover - 32232 Series" or "EMI Cover - 32188 Series" as appropriate (see Figures 2a and 2b for pictures) and install the base cover.
13. Turn the machine ON.
14. Conduct machine functional tests to verify that the Main PCB is good.
15. Run the AMPASSXXX test design long enough to ensure that all electronics and motors are functioning. It is not necessary to run the entire design. It is probably sufficient just to run the first two parts of AMPASSXXX (horizontal and vertical columns).
![]()