The proper thread path from the cone of thread to the eye of the needle is critical in the operation of the AMAYA. Ensuring that the thread moves along the appropriate route will help prevent thread breaks as well as increase efficiency and sew quality. Understanding the upper threading will also help in troubleshooting.
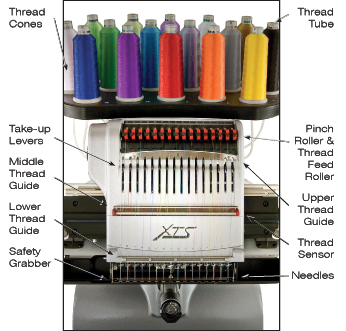
The following image displays the main components of the needle case and the upper threading system.
Threading the Machine for the First Time
When you first receive your machine, there will be thread in the system. The tops of the thread will most likely be taped to the side of the thread tree. Remove the tape and untwist the threads. New cones of thread may now be placed on the thread tree using the quick thread change method below.
Quick Thread Change
Changing a cone of thread does not require rethreading the entire path. If thread is already in the system, the fastest and easiest way to change a cone of thread is to remove the old cone but leave a good length of the old thread on the machine.


- It is recommended that you install a thread clover on any post accepting a larger cone of thread that does not fit securely.
- Place the new cone of thread on the thread tree with the old thread end sticking out of the thread tube and over the new cone.
- The black clover may need to be collapsed to allow the new cone onto the thread seat. If the clover is to low on the thread tube, the new cone of thread may not be able to sit securely on the thread seat. If this is the case, move the clover up the thread tube and try again.
- If the thread is caught in the clover, pull it thread up through the hole in the clover and free.
- Extend the plastic thread tube ½ to 1 inch above the cone.
Neglecting to extend the thread tube ½ to 1 inch above the cone could result in frequent thread breaks. - Tie the end of the old thread to the end of new thread using a square knot.
- Lift the red pinch roller and carefully pull the thread from the back of the needle. This will pull the new thread completely through the system. If the knot is tight and small enough, it will even slip through the eye of the needle.
- When finished, line up the thread under the pinch roller and press the pinch roller back down.
- If desired, the thread can then be held by the retaining spring in front of the lower thread guide or held in place using the grabber. With your hands out of the way, press the adjustment and center keys on the keypad simultaneously to close the grabber and move the thread into the holder behind the needles.

Press the keys again to open the grabber. - Trim the end to about an inch in length.
Upper Thread Path
If the thread comes out of the system, you may need to thread the machine without a starter thread.

- To start a new cone of thread, push the plastic thread tubes up from behind the thread tree. Place the cone of thread on the thread seat. The thread tube should extend ½ to 1 inch above the cone.
Neglecting to extend the thread tube ½ to 1 inch above the cone could result in frequent thread breaks. - Using either the monofilament provided in the operator’s kit or a can of compressed air, feed the thread through the thread tube from the cone to the small hole behind the thread feeder assembly.
- To use the monofilament, locate the small hole behind the thread feed assembly. Push the monofilament into this hole and up through the supply tube until the end extends above the cone of thread. Then, Secure the end of the thread in the notch of the monofilament and slowly pull the thread through the tube.
- If using compressed air, place the end of the thread in to the top of the thread supply tube. Feed enough that the thread will stay without holding it. Now blow the compressed air into the tube. The air will carry the thread and shoot out the front of the machine.
- Using the black tab just in front, lift the red pinch roller.
- Pull the thread from the hole and place it under the pinch roller. Be sure to align the thread with the small v-notch in the thread feed cover.
- Press the black tab to lower the pinch roller.
- Bring the thread down through the upper thread guide.
- Pull the thread down to the middle thread guide. Of the three holes, push the thread from the top through the back right hole. Make sure the thread is on the right side of the take-up lever.
- Bring the thread around the thread sensor from back to front and up through the front hole of the middle thread guide.
- Pull the thread up and through the eye of the take-up lever from right to left.
- Route the thread straight down through the back left hole in the middle thread guide.
- Feed the thread down through the lower thread guide.
- Thread the needle from front to back. Cutting the end of the thread may allow it to more easily pass through the eye.
- If desired, the thread can then be held by the retaining spring in front of the lower thread guide or held in place using the grabber. With your hands out of the way, press the adjustment and center keys on the keypad simultaneously to close the grabber and move the thread into the holder behind the needles.
Press the keys again to open the grabber. - Trim the end to about an inch in length.