Capping Station maintenance should be completed at the end of each use of the printer daily (if printing daily).
 |
| To avoid ink drying in the Print Head Nozzles the Print Head Carriage should not be moved away from the parked position for more than 15 minutes |
|
|
| To avoid contaminating the cleaning solution in the bottle, never draw solution directly from the bottle with the syringe. |
Pour some cleaning solution into the cap of the cleaning solution bottle or a clean dry comparable container.
Draw the cleaning solution into the syringe from the bottle cap or container.
Fill the Capping Station to it's capacity with cleaning solution from the syringe.
Return the Print Head Carriage to the parked position by slowly sliding it to the right until you hear a slight clicking sound indicating it has securely locked in the parked position.
|
|
| It is not necessary to push down on the blue release lever when sliding the Print Head Carriage back to the parked position. |
Verify the parked position was properly reached by attempting to move the Print Head Carriage to the left away from the parked position without pushing down the blue release lever. It should be securely locked in the parked position at this point.
Close the lid and command a Normal Cleaning cycle by pressing and holding the Menu button for 3 - 4 seconds. The printer display will read "CLEANING" once the cycle has started. This cleaning cycle take approximately 5 minutes to complete.
When complete the display will read "READY". Raise the lid and once again release the Print Head Carriage and slide it to the left away from the parked position.
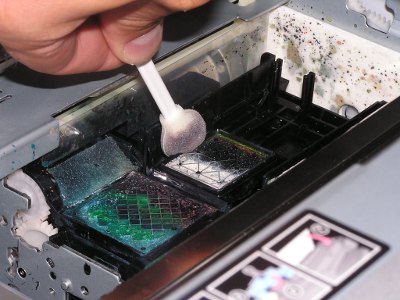
Dampen a cleaning applicator with cleaning solution by dipping it into the bottle cap of cleaning solution.
|
|
| To avoid contaminating the cleaning solution in the bottle, never draw solution directly from the bottle with the syringe. |
Scrub the seal of the Capping Station on all four sides and the top edges with the applicator to remove all ink deposits. Use moderate pressure with the cleaning applicator when removing the ink deposits from the seal. It is better to make multiple passes to remove the ink deposits gradually instead of using excessive force that may damage the seal. Continue cleaning until all four edges of the seal are black and all ink deposits have been removed. This cleaning process will keep the seal clean and pliable creating a good seating surface for the Print Head. A good seal between the Print Head and the Capping Station seal prevents the ink in the Print Head Nozzles from drying and allows proper vacuum pressure to be generated by the printer pump during the cleaning cycles.

Return the Print Head Carriage to the parked position and close the lid if no other cleaning is to be completed at this time.