![]()
|
|
This repair requires timing and other adjustments and should be done by a Melco authorized service technician. |
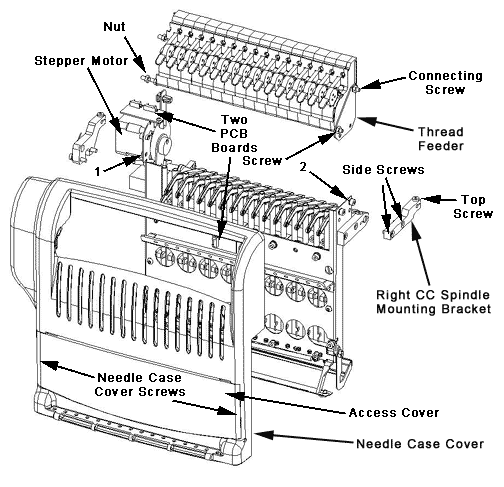
Figure 1 - Needlecase Assembly
1. Verify that the machine is turned OFF.
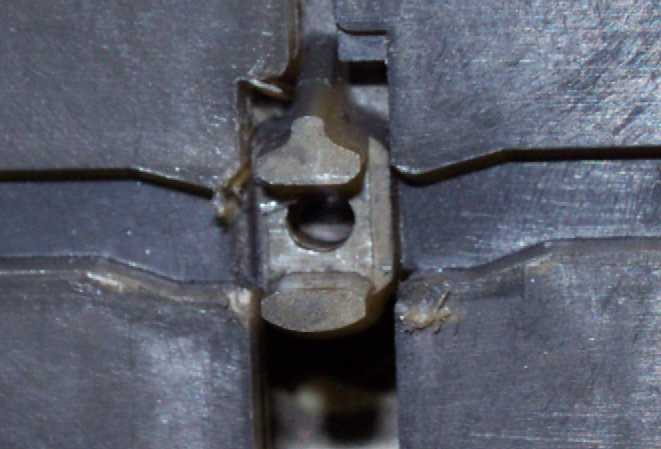
Figure 2 - Reciprocator at "Head Up" Position
2. Reach into the access opening on the bottom side of the sewing head and manually turn the z-shaft until the needle bar drive slot of the reciprocator is aligned to the drive grooves on the left and right upper arm covers as shown in Figure 2 above.
3. Handle the needlecase carefully so you do not damage any components.
4. Slide the needle case to the right while lifting the presser foot to clear the grabber bracket.
5. Connect the harnesses to the two PCB's and the stepper motor (Figure 1).
6. Install the 2 screws holding the needle case cover and tighten the screws to Melco Torque Specifications.
7. Install the right CC spindle mounting bracket, starting the two side screws loose and then tightening them to snug. Tighten the top screw to Melco Torque Specifications.
8. Tighten the top screw on the left CC spindle mounting bracket clamp.
9. Reconnect the thread tubes to the back of the thread feeder assembly in the correct numerical order from right to left (as you face the front of the needlecase).
10. Reinstall the needlecase cover.
11. Replace the needlecase access cover to the needle case assembly.
|
|
IMPORTANT! Verify needle depth and hook timing anytime you reinstall the needle case! |
12. Complete any remaining work you have left on the machine, then turn the machine back on. To do so, disengage the emergency stop (if it is engaged) by twisting ![]() left or right until the red button pops out and turn the main power switch ON.
left or right until the red button pops out and turn the main power switch ON.
13. Verify needle depth and hook timing.
![]()