![]()
|
|
This repair requires timing and other adjustments and can only be done by a Melco authorized service technician. |
Bobbin shaft components that might require replacement are the two radial bearings located on the front and back of the machine. The bobbin shaft affects the under thread sewing operations.
Replacement Parts Needed:
Radial Bearing (order two PN: 30951-05)
|
|
When replacing the radial bearings, always replace both of them as a pair. |
|
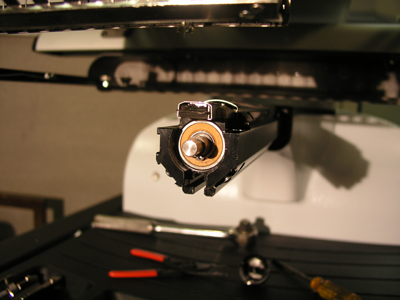
Figure 1 - Bobbin Shaft Front View |
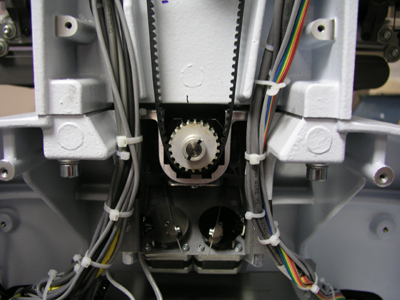
Figure 2 - Bobbin Shaft Timing Pulley (Rear) |
1. Remove the needle plate.
2. Remove the rotary hook support.
3. Remove both of the rotary hook guards.
4. Remove the rotary hook.
5. Remove either the left or right transparent arm cover and remove the screw from the back of the other one.
6. Remove the rear upper and lower arm covers.
7. Release the tension from the z-belt by loosening the belt tensioner screw with a 4mm Allen wrench.
8. Remove the timing pulley by punching out the roll pin. Melco recommends that the roll pin not be re-used after it has been removed.
9. Remove the snap ring from the front of the bobbin shaft.
10. Tap the bobbin shaft toward the rear of the lower arm casting to release the pressure from the compression spring. Use a rubber mallet or a brass drift so as not to damage the front of the shaft.
11. Replace the compression spring and the rear linear bearing.
12. Replace the timing pulley on the bobbin shaft and make sure that the rear radial bearing is in contact with the pulley.
13. Push the bobbin shaft back into the lower arm until it makes solid contact.
14. While holding the shaft in place, push the front radial bearing onto the shaft and insert the retaining clip. This is usually easier with two people.
15. Install the rotary hook, rotary hook guards, rotary hook support, and the needle plate.
16. Install the z-axis timing belt and tension the z-belt to Melco Specifications following procedures in Z-Belt Replacement and Tensioning..
17. Install the rear upper and lower arm covers.
18. Install the transparent arm cover and replace the rear screw on the other one.
![]()