Editing Points
(Available in DesignShop and higher product levels)
There are two types of points you can edit in DesignShop. You
can edit wireframe points in elements that contain this type of point.
You can
also edit stitch points in both expanded and wireframe elements. This
section provides information on working with these two types of points.
Note that you can change the size of points in the View Window by selecting
Tools->Options,
then clicking the Editing Properties
tab. In this tab you can select the desired point size.
Adding and Editing Wireframe Points
Click the left mouse button to add straight points and click the right
mouse button to add curved points. Straight
points appear as small triangles, while curved points appear as small
circles.
To edit wireframe points, you must select them first. You
can select them from the Project View
Tree by left-clicking them. (You can select multiple points in
the Project Tree View by pressing
and holding the CTRL
key, then left-clicking the points you wish to select). You can also press
and hold the SHIFT
key to select a range of wireframe points.
When you place your cursor over wireframe points in the View
Window, you will see a  over straight points and
a
over straight points and
a  over curved points. When one of these cursors is visible
you can left-click to select the point. You can select a group of points
in a selected element in the View Window
by pressing the SHIFT
key, left-clicking
and holding down the mouse button and dragging a box around the desired
group of points.
over curved points. When one of these cursors is visible
you can left-click to select the point. You can select a group of points
in a selected element in the View Window
by pressing the SHIFT
key, left-clicking
and holding down the mouse button and dragging a box around the desired
group of points.
The Custom
Selection toolbar button  can be used to select
a group of points more precisely. To do this, select an element, then
click the Custom Selection toolbar
button. Using the custom selection cursor, within the selected element,
left-click as many times as necessary to outline the points you wish to
select (you can also left-click, then drag the mouse to outline the points).
Press ENTER
or click the middle mouse button. You can then move the points you have
selected.
can be used to select
a group of points more precisely. To do this, select an element, then
click the Custom Selection toolbar
button. Using the custom selection cursor, within the selected element,
left-click as many times as necessary to outline the points you wish to
select (you can also left-click, then drag the mouse to outline the points).
Press ENTER
or click the middle mouse button. You can then move the points you have
selected.
Once a point (or a group of points) is selected, you
can drag (hold down the left mouse button) and drop it (release the left
mouse button) to the desired location. The stitches will be updated automatically
to reflect the change. (You can also delete a point once it is selected
by pressing the DELETE
key on your keyboard.)
You can also edit entry and exit points for all elements
(walk stitches, columns, and fills). Entry points are represented by  and exit points are represented by
  . You
can move these entry and exit points by left-clicking them, then dragging
and dropping them.
. You
can move these entry and exit points by left-clicking them, then dragging
and dropping them.
You can also edit the stitch direction points of complex fills. These
stitch direction points are represented by diamonds (see image below).
You can move stitch direction points (which changes the stitch direction)
by left-clicking a stitch direction point to select it, then dragging
and dropping it.

Once a point is selected (in the Project
Tree View or the View Window)
you can right-click on it to view its properties (available in DesignShop
and higher product levels only). (You can also double-click a point in
either location to view its properties).
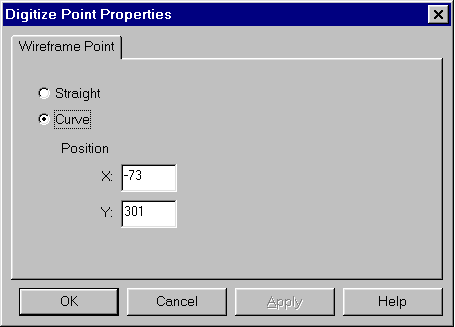
Straight/Curve: You can change
the type of point to Straight or Curve by selecting the radio button for
that type.
Position: You can change the
position of the point by typing new locations in the X
and Y text boxes.
You also have the option of adding digitizing points
to an element outline. Move the cursor along the outline to get this cursor
 . Then simply left-click to insert a straight point and
right-click to insert a curved point.
. Then simply left-click to insert a straight point and
right-click to insert a curved point.
Editing Stitch Points
You can perform stitch editing in both expanded and wireframe elements.
Stitch Editing in Expanded Elements
To view a list of the stitch points in expanded elements, click on the
Stitches tab in the Project View.
This tab will show you all of the stitch points in a project. Click here
for more information on the Stitches tab.
To edit stitch points, first click the Stitch
Editing button  . This will activate Stitch
Editing Mode.
. This will activate Stitch
Editing Mode.
When you move the cursor over the design, the mouse cursor will change.
This cursor  indicates that the mouse is over a stitch
point. When you see this cursor, you can left-click the point and drag
it to the desired location.
indicates that the mouse is over a stitch
point. When you see this cursor, you can left-click the point and drag
it to the desired location.
You can select points from the stitch list in the Stitches
tab by left-clicking. When you have a point selected, this is indicated
by the following graphic  in the View
Window. When a point is selected, you can right-click the point,
then select Properties from the
popup menu. In the dialog that appears, you can change the type of stitch
from normal to jump stitch (or vice versa).
in the View
Window. When a point is selected, you can right-click the point,
then select Properties from the
popup menu. In the dialog that appears, you can change the type of stitch
from normal to jump stitch (or vice versa).
You can select multiple points in the Stitch
List by left-clicking a point, pressing the CTRL
key on your keypad, and left-clicking the other points you want to select.
You can also press and hold the SHIFT
key to select a range of stitch points. You can select a group of points
in the View Window by pressing
the SHIFT
key, left-clicking and holding down the mouse button and dragging a box
around the desired group of points.
The Custom Selection toolbar
button can be used to select a group of points more precisely.
To do this, select an element, then click the Custom
Selection toolbar button. Using the custom selection cursor, within
the selected element, left-click as many times as necessary to outline
the points you wish to select (you can also left-click, then drag the
mouse to outline the points). Press ENTER
or click the middle mouse button. You can then move the points you have
selected.
To perform single stitch point editing in a selected group of points,
press CTRL + SHIFT,
then draw a box around the desired group of points. The first point in
this group will be selected, and you can navigate within this group of
points to edit points individually.
You can also delete and add stitch points. To delete a selected point,
simply press the DELETE
key on your keyboard. When you see this cursor this cursor in the View Window,
you can left-click to add a normal stitch or right-click to add a jump
stitch.
To insert color changes and trims between stitches, select a stitch
then click the appropriate toolbar button (color change or trim).
Stitch Editing in Wireframe Elements
To edit stitch points in wireframe
elements, click the Stitch Editing
button  (next to the Wireframe
Editing Mode button). This will activate Stitch Editing Mode, and
you can now edit the stitch points. (The editing process is the same as
for editing stitch points in expanded elements; click here
for instructions).
(next to the Wireframe
Editing Mode button). This will activate Stitch Editing Mode, and
you can now edit the stitch points. (The editing process is the same as
for editing stitch points in expanded elements; click here
for instructions).
Please note that if you make a change in Stitch Editing Mode, then return
to Wireframe Edit Mode (by clicking the Edit
Mode button) and edit wireframe points, you will lose the changes
you made in Stitch Editing Mode.
Editing Tie In/Off Stitches
You can also edit tie in and tie off stitches. To do this they must
first be turned on in the Lock Stitch / Trim tab. Then, make sure Show Tie Ins/Tie Offs is turned on in
the View tab. This will make
the tie ins/offs visible in the View
Window. (These stitches are displayed in the Stitches
tab as TI for Tie
Ins and TO for Tie
Offs).
Click the Stitch Editing button
(next to the Wireframe
Editing Mode button). This will activate Stitch
Editing Mode, and you can now edit the tie in /off stitches. (The
editing process is the same as for editing stitch points; click here
for instructions).
Convert Expanded To Wireframe
DesignShop will allow you to convert expanded data to wireframe data.
You can do this at all levels: project, design, and element. There are
three different methods for converting expanded data: through the View Window, the Project
View, or the Edit menu.
You can convert one or more expanded elements at a time.
This feature only applies to DesignShop Pro and higher
product levels.

Converting Expanded Data Through the View
Window or Project View:
1. Right-click
on the element, design, or project.
2. Select
Convert Expanded To Wireframe
from the pop-up menu.
Converting Expanded Data Through the Edit
Menu:
1. Select the element, design, or project through the
View Window or Project
View.
2. Select Edit->Convert
Expanded To Wireframe.
