This section discusses all of the functions involved with working with embroidery and graphic files in DesignShop.
You can create a new file in two ways: by selecting File->New or by clicking the New File toolbar button in the Main toolbar.
This creates a new blank view window or project based on default settings.

 Opening Designs Video
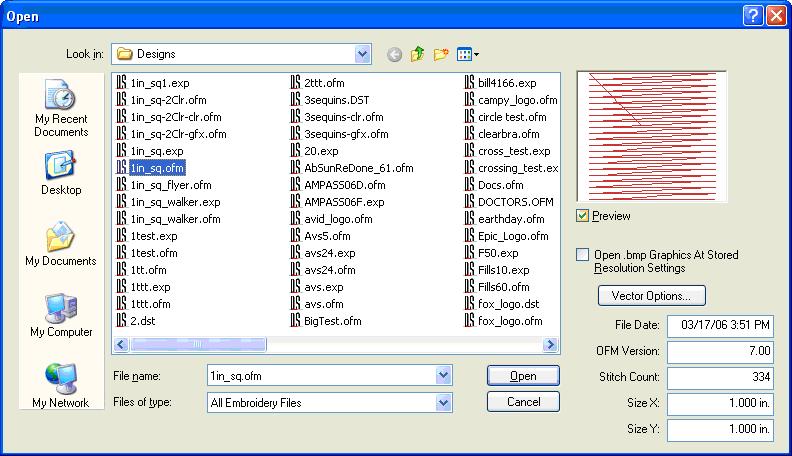
You can open a file in two ways: by selecting File->Open or by clicking the Open File toolbar button in the Main toolbar.
This will provide you with the Open dialog box. In this dialog box, you have the ability to browse for the desired file or project. You also have the ability to view a thumbnail image of each design as it is selected. The thumbnail image is displayed on the right side of the Open dialog box. With the Open dialog box, you can open embroidery files, project files, condensed files, expanded files, Tajima files, OFM files, and graphics files. You can open files directly from the Design Database. If you check the Preview box, you see additional information about the file you have selected to open. The information shown includes the file date, the OFM version, the stitch count, and the size of the design. This information can also be viewed when using File->Insert. See the example below.
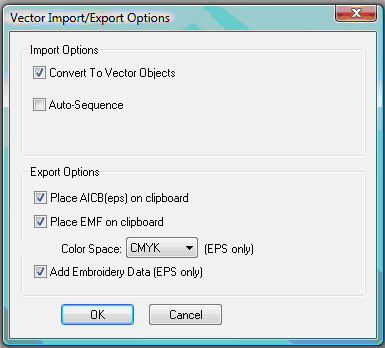
You can also set parameters associated with vector file support. Go to File->Open. You will see a Vector Options button. Click on it and you get this dialog:
Import Options:
Convert To Vector Objects - If this box is checked, the vector file opens as a layered graphic. If it is not checked, the file opens as a flat graphic..
Auto Sequence - If this is checked, vector objects will be sequenced automatically. See Auto-Sequencing.
Export Options:
Place AICB(eps) on clipboard: If this is checked, it indicates that AICB (Adobe Illustrator Clipboard) data should be placed on the clipboard. Corel Draw and Adobe Illustrator support this function. AICB gives the best results for copying to vector programs.
Place EMF on clipboard: If this is checked, it indicates that the information is placed on an EMF (Enhanced Metafile) clipboard. Most programs support EMF clipboard format.
Color Space: Indicates whether colors should be in RGB or CMYK format when saving as .eps or copying to a vector program. CMYK is compatible with all programs and formats. RGB has more exact colors but may not always be compatible.
Add Embroidery Date (EPS only): If this is checked it adds special tag objects that are copied to Adobe Illustrator (or saved as an .eps). A limited amount of stitching information is maintained for copying back.
NOTE: When doing lettering in Adobe Illustrator, the lettering MUST be converted to outlines before copying/pasting into DesignShop or saving as a Vector file. If it is not, it will not come into DesignShop properly. In Corel Draw, a lettering object must be Converted to Curves, then Broken Apart. If not, it will not come into DesignShop properly. Refer to Copying and Pasting Between Adobe Illustrator and DesignShop for more information.
You can open the following embroidery file formats:
|
Commercial Formats Graphics Files (DesignShop and higher product levels) Melco Project Files (*.ofm) Melco Condensed Files (*.cnd) Melco Expanded Files (*.exp) Melco 3.5 Inch Floppy (non-DOS, regular & hi reliability) Saurer SHC (*.pat) Tajima DOS (*.dst) Tajima Lo & Hi Density Floppy (non-DOS) ZSK Floppy (non-DOS) ZSK (DOS) (.zsk) Barudan FDR / FMC Floppy (non-DOS) Barudan FDR / FMC (DOS) (*.fdr / *.fmc) Saurer SHC (*.pat) |
Home Formats Brother/Babylock/Bernina (*.pec) Brother/Babylock/Bernina (*.pes) Janome / Elna Files (*.sew) Janome Files (*.pes, *.jef) Pfaff Files (*.pcs) Pfaff Macintosh (*.pcm) Poem/Singer Embroidery Files (*.csd) Singer (*.xxx) Husqvarna Viking (*.hus) Oklahoma Embroidery .oef (read only) Elna (*.emd) Viking D1 (*.shv) Great Notions Condensed (*.gnc) (read only)
|
In the DesignShop or higher product level, you will have an option on the open dialog box for Open .bmp Graphics At Stored Resolution Setting. If checked, this option will open graphics files at the resolution that they were saved at. If this option is unchecked, the graphic will open at 254 dpi (dots per inch).

You can insert a file or project in two ways: by selecting File->Insert or by clicking the Insert tool button on the Main toolbar.
This will provide you with the Insert dialog box. In this dialog box, you have the ability to browse for the desired file or project. You also have the ability to view a thumbnail image of each design as it is selected. The thumbnail image is displayed on the right side of the Insert dialog box. With the Insert dialog box, you can insert a file into the current project. You have the ability to insert embroidery files, condensed files, expanded files, Tajima files, OFM files, and graphics files. When you insert a project file into another project file, the project file will be inserted as a design.
You can insert the following types of files:
|
Commercial Formats Graphics Files (DesignShop and higher product levels) Melco Project Files (*.ofm) Melco Condensed Files (*.cnd) Melco Expanded Files (*.exp) Melco 3.5 Inch Floppy (non-DOS, regular & hi reliability) Tajima DOS (*.dst) Tajima Lo & Hi Density Floppy (non-DOS) ZSK Floppy (non-DOS) ZSK (DOS) (.zsk) Barudan FDR / FMC Floppy (non-DOS) Barudan FDR / FMC (DOS) (*.fdr / *.fmc) |
Home Formats Brother/Babylock/Bernina (*.pec) Brother/Babylock/Bernina (*.pes) Janome / Elna Files (*.sew) Janome Files (*.pes, *.jef) Pfaff Files (*.pcs) Pfaff Macintosh (*.pcm) Poem/Singer Embroidery Files (*.csd) Singer (*.xxx) Husqvarna Viking (*.hus) Oklahoma Embroidery .oef (read only) Elna (*.emd) Viking D1 (*.shv) Great Notions Condensed (*.gnc) (read only) |
This function is useful when you want to insert two or more designs into the same project. When you have the first design open in the project, simply select File->Insert to insert another design.
In the DesignShop or higher product level you will have an option on the insert dialog box for Open graphics at resolution settings stored in file. If checked, this option will insert graphics files at the resolution that they were saved at. If this option is unchecked, the graphic will insert at 254 dpi.

Saving Designs Video
You can save a file in two ways: by selecting File->Save or by clicking the Save File toolbar button in the Main toolbar.
This will save the active file with its current file name, location, and file format. If these properties have not already been defined, you will receive the Save As dialog box.

When using Corel Draw to save .cdr or .eps files that contain text, it is recommended that the text be saved as outlines.
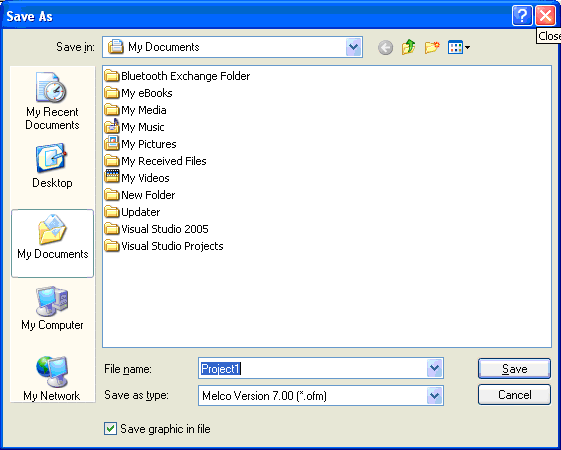
When you select File->Save As or you receive the Save As dialog box when selecting the Save toolbar button, you will need to determine the file name, location, and format. You can save files directly to the Design Database. You can save in the following formats:
|
Commercial Formats Project Files (*.ofm) Melco Version 7.00, 6.08, 5.07, 4.02, 4.01, 3.00, 2.00 Condensed Files (*.cnd) Expanded Files (*.exp) Melco
3.5 Inch Floppy Tajima Lo & Hi Density Floppy (non-DOS) ZSK Floppy (non-DOS) ZSK (DOS) (.zsk) Barudan FDR Files (*.fdr) Barudan FMC Files (*.fmc) Baby Lock Files (*.pes) Viking Files (*.hus) Bitmap Files (*.bmp) PCX Files (*.pcx) JPEG Files (*.jpg) TIFF Files (*.tif) (graphics files in DesignShop and higher product levels) |
Home Formats Brother/Babylock/Bernina (*.pec) Brother/Babylock/Bernina (*.pes) Janome / Elna Files (*.sew) Janome Files (*.pes, *.jef) Pfaff Files (*.pcs) Pfaff Macintosh (*.pcm) Poem/Singer Embroidery Files (*.csd) Singer (*.xxx) Husqvarna Viking (*.hus) Elna (*.emd) Viking D1 (*.shv) |
There is one universal OFM file format. This universal format can be read by all versions of DesignShop. On DesignShop versions lower than 9.00.000 the design will be read as expanded data. The user can convert the expanded data to wireframe data, if desired.
Note: When saving in the Tajima format, the files internal file name can be entered in the Save As dialog (in the Tajima Internal Filename textbox). If this textbox is left blank, the internal file name will be changed to match the Windows file name.
In order to make sure that the graphic information is saved with the .ofm file, check the Save Graphic in File box at the bottom of the Save As dialog.
If you open an EDS III .OFM file and save
it, it will be converted into an DesignShop .OFM file, which is no longer
readable in EDS III.
Files saved in this version of DesignShop cannot be read by previous versions
of DesignShop.
Some of the designs you work with may be on a floppy disk. DesignShop is compatible with DOS, Melco, Premier, Tajima, Barudan FDR and FMC, and ZSK disks, all of which have unique formats.
The following chart outlines when to use each command:
|
To perform this operation |
Use this command for DOS formats |
Use this command for non-DOS formats |
|---|---|---|
|
Load design file into DesignShop |
Open or Import |
Import |
|
Save to hard drive (all files saved on the hard drive are DOS formats) |
Save or Save As |
N/A |
|
Save to floppy disk |
Save, Save As, or Export |
Format the disk appropriately, then Export |
Even when you choose the wrong format, Design Shop will automatically select the correct format for you.
To import a design, select File->Import. The Import dialog box will pop up. The steps for importing are illustrated below.
If you click on the Options button while working with a Tajima format disk, a message box will ask you if you want to update the Boot Record of the disk. This refers to some Tajima disks that have an improper internal label and cannot be read by a DOS computer. If you have problems loading a Tajima disk, click on the Options button and respond Yes to the message.
If you click on the Options button while working with a Tajima format disk, a message box will ask you if you want to update the Boot Record of the disk. This refers to some Tajima disks that have an improper internal label and cannot be read by a DOS computer. If you have problems loading a Tajima disk, click on the Options button and respond Yes to the message.
|
|
Disks must be formatted to match the file type before a file can be written to it. You can format the disk from the Export or Import dialog box. Follow these steps to format a disk:
Important Information on the Melco Format:
The Melco format was developed to work with early Melco embroidery machines and other older embroidery products. Hardware required to read the Melco format is becoming increasingly difficult for Melco's suppliers to provide. Therefore, Melco cannot guarantee that it will be able to support the Melco format in the future.
Melco recommends exporting designs in the Melco format ONLY when the equipment sewing the design requires the Melco format. Otherwise, save designs in the DOS format or the format associated with your particular embroidery product.
Other embroidery formats supported by DesignShop are not affected by this situation.
Remember, a disk must be of the proper format before you can export a design to it.
Select File->Export to display the Export dialog box.
If you are not sure of the format, click on Unknown, then on the Directory button. DesignShop will determine the format of the disk and make the selection for you.
Needle Sequence (for non-DOS Disk and Tape Output):
Needle Sequencing allows the user to produce designs that contain embedded needle sequence information particular to Barudan and ZSK multi-head peripherals. The Needle Sequence dialog box is displayed when you click on the Options button in the Export dialog box.
The number of allowed Needle Sequences (i.e., color changes) has increased from 7 to 99. Currently, the maximum needle value is 7.

Design
Notes Video
Once you have saved notes to your designs, you will see a picture of the notes tool added to the top level project in the project view.
Design Notes is a useful tool for documenting information about designs (e.g., maximum & minimum height, width, stitch count, colors, etc.).
To insert notes, simply click on the Design Notes tool in the Main toolbar. (If the project you are working in already contains design notes, you will see text in the window that appears.) Type the desired text and save the design notes file.
To view design notes, right-click the top level project in the stitch list and select Design Notes from the pop-up menu. You can also select View->Design Notes or click the Design Notes toolbar button.
See Notes Editor for instructions on how to change the editor used to create design notes.
The filename conventions for floppy disk formats are given below. These rules must be followed for the disk to be read by other systems:
DOS format names consist of a 1-8 character filename and one of the following extensions:
.CND - Condensed Format
.EXP - Expanded Format
.OFM - Project (Layout format)
Barudan FDR uses a numeric format. The file number can be from 1 to 99. In addition, a label of up to 8 characters may be specified with this file number. The number and the label must be separated by a colon.
Examples:
3
26:SNAIL
Barudan FMC uses a numeric format. The file number can be from 1 to 99. In addition, a colon can be entered after the number. No character labels are allowed.
Examples:
3
26:
MELCO format names consist of a 1-6 character filename and one of the following extensions:
.CND - Condensed Format
.EXP - Expanded Format
Tajima format uses a numeric format with numbers ranging from 1-999. In addition to a filename, a 1-8 character label can be specified after the filename and separated by a colon (like the Barudan FDR format.)
Examples:
1
G001 (How the old Tajima format stored the name 1)
1:TEST
APPLE:TEST (The new Tajima Format)
Zsk format uses a numeric format with numbers ranging from 1-999.
Examples:
1
12
234
You can easily email designs from within DesignShop. When you are ready to email a design (for example, you have completed digitizing a design and need to send it out), select File->Send. This will create a blank email message (using your default email program) with the current project file as an attachment.

Printing
Designs Video
You can print a design in 3D view after pressing the View Stitches in 3D button then printing.
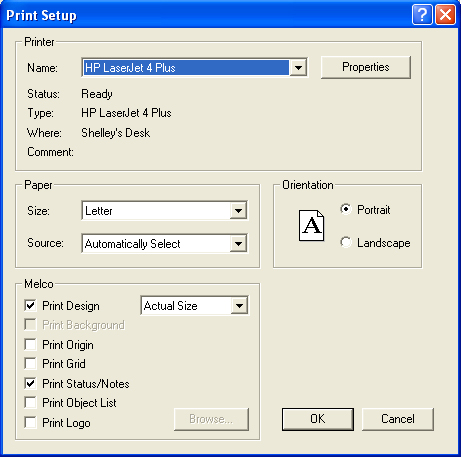
When you click on the Print tool, you will get a dialog page where you can select the printer, number of copies, and what to print.
When choosing what to print, you have the option of printing the Design, the Status/Notes, and the Object (stitch) list. (Simply left-click the checkboxes).
If you have the grid or the design origin turned on (displayed), you can print these as well.
If you have changed the background color (so that it is no longer white), you can also print the design with this background color.
You can also print a company logo at the top of a Design Shop design printout. To do this, click the checkbox next to Print Logo. Then click the Browse button to select the graphics file (it must be a bitmap) you wish to insert. When the logo is inserted, it is centered at the top of the printout. You cannot resize the logo once it is inserted; all resizing must be done before inserting the file. It has been determined that 7.2 x 1.2 inches is the ideal logo size. If the logo is any larger than this recommended size, the entire logo will not be visible.
As long as the Print Logo box is checked, the logo you have selected will appear on all DesignShop design printouts. You can click the Browse button to select another graphics file at any time. If you move or delete the graphic that you have selected to print, the Print Logo function will not work.
Print is also located under the File menu along with Print Preview and Print Setup...
File-> Print Preview: Allows you to preview what the printout will look like.
File->Print Setup..: Allows you to set up your print options without printing.
If you are using both DesignShop 2005 (or higher) and AMAYA OS 2005 (or higher), both of these programs have tools built in that allow the transfer of files between the two programs. To send a design to the AMAYA machine from DesignShop, select Machine->Load Design (you can also select Machine->Add to Job List to place a design on the machine Job List). When you have a file loaded in AMAYA OS, and you want to edit the file in DesignShop, click the DesignShop logo button. This will open the design in a DesignShop window.
If you do not have both DesignShop 2005 (or higher) and AMAYA OS 2005 (or higher), you cannot send a design to an AMAYA machine from DesignShop. To sew a design you have been working on in DesignShop, save the design in DesignShop, then open it in AMAYA OS. Please note that machine settings (such as material thickness) will be saved with ofm files. You can edit these machine settings in DesignShop in the Machine Settings property tab.
For this to work correctly with ofm files, ofm files that are saved from AMAYA OS should be saved as a file version that can be opened by DesignShop (and vice versa, files that are saved from DesignShop should be saved as a file version that can be opened by AMAYA OS). Please see the table below to determine which ofm file versions can be opened with your versions of AMAYA OS and DesignShop. (Select Help->About in the program to determine the program version).
|
Program Version |
OFM File Versions |
|
DesignShop ver. 4.01.017 and below |
Melco Version 4.01 ofm |
|
AMAYA OS ver. 4.01.019 and below |
Melco Version 4.01 ofm |
|
DesignShop ver. 4.02.022 and higher (lower than 5.06.001) |
Melco Version 4.02 ofm |
|
AMAYA OS ver. 4.02.022 and higher (lower than 5.06.001) |
Melco Version 4.02 ofm |
|
DesignShop ver. 5.06.001 and higher |
Melco Version 5.07 ofm |
|
AMAYA OS ver. 5.06.001 and higher |
Melco Version 5.07 ofm |
|
DesignShop ver. 6.08.xxx and higher |
Melco Version 6.08 ofm Melco Version 5.07 ofm |
|
AMAYA OS ver. 6.08.xxx and higher |
Melco Version 6.08 ofm Melco Version 5.07 ofm |
|
DesignShop ver. 7.00.xxx and higher |
Melco Version 7.00 ofm Melco Version 6.08 ofm Melco Version 5.07 ofm |
|
AMAYA OS ver. 7.00.xxx and higher |
Melco Version 7.00 ofm Melco Version 6.08 ofm Melco Version 5.07 ofm |
You can change DesignShop file options by selecting Tools->Options, then selecting the File Options tab.
If your computer stops responding while you are working in DesignShop, the next time you open DesignShop you will be given the option to recover any work that was saved with Auto Save. After the recovered files are open you should save them with a new name. Do not save them in the temp directory because these files are managed by DesignShop and will be deleted.
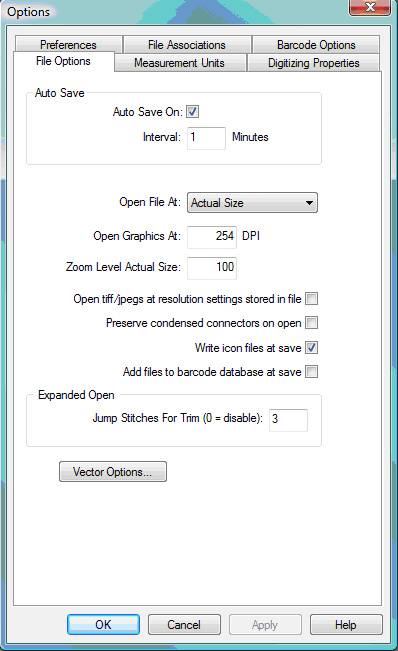
Auto Save: You can turn auto save on or off by clicking in the box next to Auto Save. A check mark in the box symbolizes that auto save is on, click again to remove the check which symbolizes that auto save is off. Next to Interval you can insert a number that will determine how often auto save will save your file.
Open File At: You can have your files open up to actual size or to fit the whole screen.
Open Graphics At: opens and/or saves graphics files at the resolution that you specify. The default 254 dpi.
Open Tiffs at resolution setting stored in file: Your .tif files open at the resolution that was stored with the file and not the dpi you have specified.
Zoom Level Actual Size: You can have your files open up and be zoomed in to the actual size (100%) or you can specify a different zoom level here.
Preserve condensed connectors on open: When this is checked DesignShop will create a jump stitch object for each portion of a condensed design that was in the needle up mode. If the box is not checked the needle up sections of the condensed design are discarded and DesignShop automatically creates connectors to move between sections of the design.
Write icon files at save: If this box is checked before you save a file, then an icon file will be created when you save. This means that when you go to open a file, you can click on the file name and you will see a picture of the file to the right of your open dialog box.
Add files to barcode database at save: When this box is checked, every time a new design is saved in DesignShop, that design will be automatically be added to the barcode design database.
Expanded Open: Jump Stitches for Trim (0=disable): This feature creates trims based on the nukber of jump stitches that you specify in this box. If you have 0 entered, the feature is disabled. If you put 4 in this box, for example, when the design is opened DesignShop sees 4 or more jump stitches and replaces them with one trim.
Vector Options: See Vector Import/Export Options.