![]()
CAUTION! Before you sew with the CCF cap frame, you must select this hoop in AMAYA OS. Neglecting to do so can cause damage to hoops and machine parts.
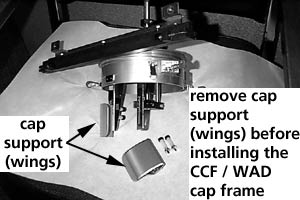
This section shows you how to attach the CCF cap frame to the already installed Dove-Tail Mounted Wide Angle Driver that has been properly modified for adaptation. The cap support wings must be removed from the Dove-Tail Mounted Wide Angle Driver and the Red Wide Angle Driver to use the CCF.
|
|
CAUTION! Before you sew with the CCF cap frame, you must select this hoop in AMAYA OS. Neglecting to do so can cause damage to hoops and machine parts. |
If you have not done so, install the AMAYA raised needle plate by removing the screws holding the regular needle plate in place and securing the raised needle plate with the screws.
|
|
Important: You must install this raised needle plate when sewing on caps on the first generation AMAYA. Neglecting to do so will result in poor sew quality. If you need to order this needle plate, part number 32196 can be ordered from www.shopmelco.com. |
The CCF cap frame is attached to the wide angle driver by the same method as the WACF cap frame is attached; however, you MUST first remove the cap supports (wings) from the driver.
|
1. FIRST, AND ABSOLUTELY MANDATORY, you MUST remove the cap supports (wings) from the Original Dove-Tail Mounted Wide Angle Driver or the Red Wide Angle Driver when using the Conventional Cap Frame.
|
|
|
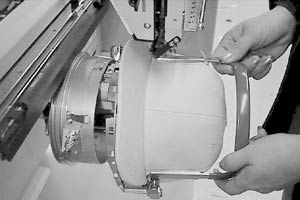
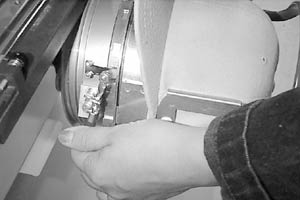
2. Open the roller clamps on the driver ring. With the CCF and Micro Clamps, only the top two are used. With any of the WACF frames, all three roller clamps will be used. Then, rotate the cap frame slightly to allow the visor to be positioned around and behind the embroidery head needle case. |
|
|
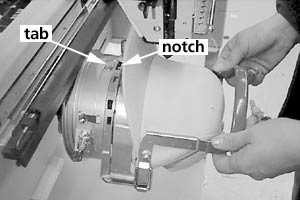
3. Rotate the cap frame back until the visor is pointing up and the notch in the cap frame is centered to the tab on the cap driver. |
|
|
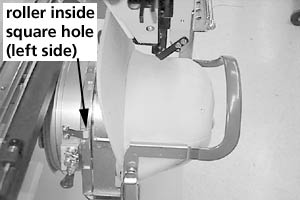
4. Slide the frame onto the driver, snapping it into place with the top two spring-loaded rollers of the driver inside the square holes of the cap frame. |
|
|
5. Close the two clamps to hold the rollers securely. For any of the WACF frames, the third clamp on the bottom of the driver ring is also used. |
|