The cap support wings of the wide angle driver will need to be removed to use the driver with the CCF or any of the micro clamps. They may also need to be removed for any design that pushes the physical limit of a specific cap style.
- Remove the Driver cylinder from the machine and lay it upside down on a flat surface.
- Remove the 4 nuts from the threaded standoffs of the cap support wing assembly.
- Make sure the 2 phillips head screws on the connecting bracket are loose.
- Install the cap support assembly on the driver cylinder. Slightly pivot the assembly left and then right during the installation to ease each post past the white rollers.
|
 |
- Assemble the 4 nuts onto the threaded posts by hand. Allow them to stay slightly loose. This will enable the adjustment of the support wing assembly to the machine.
|
 |
- With the cap support wing assembly loosely installed on the wide angle driver, install the driver onto the machine.
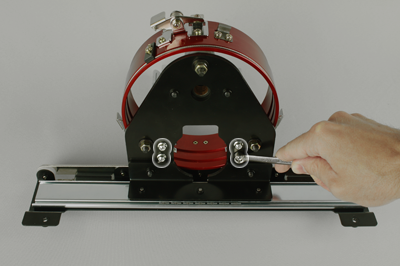
- Using two of the thumb screws from the hoop arms, attach the red drive to the x-carriage of the machine. Tighten them to finger-tight, and then use a 6mm allen wrench to tight an eighth to quarter turn more. Do not over-tighten the screws as they are designed to break before damage to the machine can occur.
|
 |
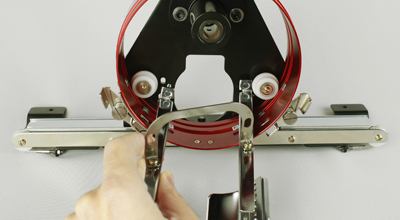
- Move the driver and carriage back until the cap support wing assembly fully covers the needle plate.
|
 |
- Place a business card between the cap support wings and the needle plate.
|
 |
- Adjust one side of the cap support until it makes contact with the business card and needle plate. Tighten the two nuts on the back of the driver.
- Repeat this process for the other side of the cap support.
|
 |
 |
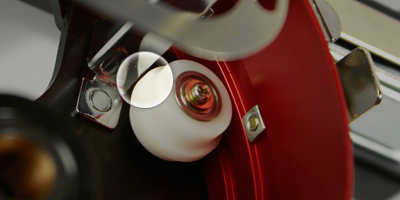
When installing the cap support wings, ensure that there is a small gap between the cap support wing mounting bracket and the white roller. If no gap is present, it will cause wear on the parts. |
|
 |
- Tighten the two phillips head screws on the connecting bracket.
- Remove the business card and check that there is a gap between the cap support wings and the needle plate. Repeat the steps above if required to achieve a slight gap.
|
 |