
Occasionally, you may need to measure the Z-position where the hook is actually timed to (0.090” rise). This may occur as the result of a mechanical bind or other causes that require the hook to be “re-timed.”
To perform hook timing, a dial indicator (PN 32543-01) and adaptor (PN:33065) are needed. You will not be able to accurately measure the hook timing position without this fixture.
Color change to the “closest needle” (noted in the bottom right corner of the base casting) and install a needle in that needle bar.
Provided that the head has been properly timed, you can proceed to the following steps. Otherwise, the head must be timed first.
Attach the dial indicator (PN: 32543) as shown in Figure 1.

Figure 1: Dial Indicator Installed on Lower Arm Extrusion
While holding the indicator plunger down, click the Bottom Center button in the AMAYA OS Maintenance>Head Timing menu. This takes the needle to Bottom Dead Center. Go to Head Up and back to Bottom Dead Center a few times (while doing this, hold the dial indicator plunger down so that the needle/pin does not slam into the fixture!). Release the dial indicator plunger.
Attach the 3 lbs. weight to the current needle bar and set the dial indicator to zero (make sure that the weight is hanging freely and is not touching the indicator plunger).
Click on the Step Forward button (1º steps) and use the micro-stepping command (Trace and Arrow Up keys) until the dial indicator reads 0.090”. Take note of the reading in the Current Z Position text block on the Maintenance>Head Timing menu screen.

Figure 2: AMAYA OS Head Timing Menu
It should match the number noted in the right bottom corner of the machine base casting. If this is not correct the rotary hook requires retiming (see Z-Timing).
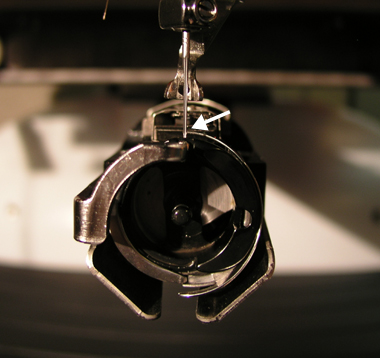
Figure 3: Hook Timing
At this 0.090” Rise position the hook position should be as shown in figure 3 above. Should this not be the case, loosen all three screws that hold the hook to the bobbin shaft and reset the rotational position of the hook.
Should you have to reset the hook position, make sure that you follow the steps in Needle Centering and Needle Guard Gap to correctly position the hook front to back.
The hook timing 0.090” rise position cannot be adjusted with the current machine design (if the z-timing is correct).
If the 0.090” rise differs from the number written in the machine casting, write the correct number (all digits!) in the casting and line out the incorrect number.
If the hook requires timing, refer to the Hook Timing Procedures.