Tie stitches are small grouping of stitches a the beginning and end of embroidery elements. Their purpose is to lock the thread in place and prevent it from pulling out when the machine starts sewing or trims. Setting tie stitches appropriately for the design will help keep the design running smoothly as well as stay in the garment after laundering.
Watch for the following issues when working with tie stitches:
- Misstarts Caused by a Lack of Tie Stitches
- Mistrims Caused by Doubled Tie Stitches
- Use the Design Filter to Optimize Locks
Misstarts Caused by a Lack of Tie Stitches
Thread breaks, or at least what look like thread breaks, can be caused from a lack of tie stitches. A lack of tie stitches will often cause the thread not to catch as the machine starts to sew. The needle may even come unthreaded. The machine will detect this as a thread break when it is really a misstart.
In DesignShop, ensure the design contains tie stitches.
Manually Digitized Tie Stitches
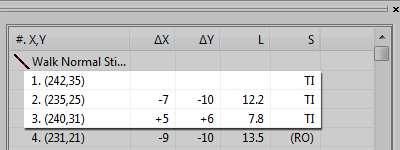
In wireframe files, you may find tie stitches in the form of manually digitized small walk normal or manual stitch elements at the beginning and end of an element. This is typical of older designs or designs from digitizers who may have started digitizing in older versions of software.
If you zoom in on the last element of a color, you may see these few stitches going back and forth across each other. If you don't see these, check the properties of the project for tie stitches.
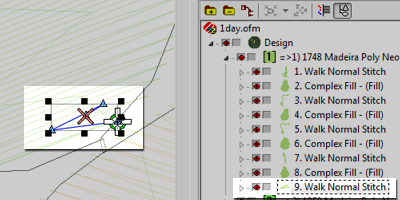
In expanded stitch files, these tie stitches are a bit harder to see because you cannot just select the last element before a trim.
Tie In/Tie Off Property
The properties window of DesignShop allows you to automatically add tie stitches to a wireframe design. To ensure that a wireframe design has tie stitches:
- Select the design in the project view and open the Object Properties window.
- With "All Elements" selected in the properties drop-down menu, select the Tie In And Tie Off.
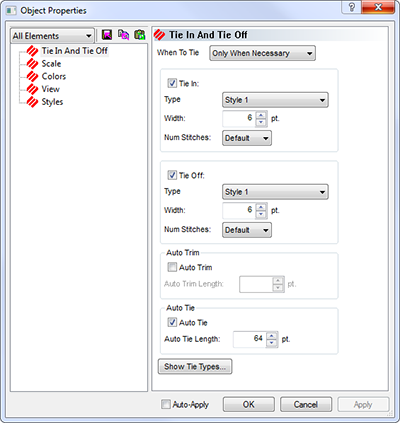
- Placing check marks in the "Tie In" and "Tie Off" boxes will add tie stitches to the beginning and/or ending of a digitized element.
- Choosing "Only When Necessary" from the "When To Tie" drop-down menu will add the tie stitches only when at a trim command or the beginning or end of the design. Choosing "Always" will add tie stitches to the entry and exit of every element.
- Clicking and will apply the changes to the object properties.
Tie stitches applied through the object properties window can also been seen in the stitches tab as "TI" or "TO" (Tie In or Tie Off).
The ideal tie stitch for the AMAYA is most often style 1 with a width of 6 points and the number of stitches set to "Default". This creates a nice small stitch pattern that adjusts how aggressive the tie stitch is based on the length of the stitch line. Since longer stitch lines usually require more aggressive tie stitches, this works well for most applications.
Mistrims Caused by Doubled Tie Stitches
Using object properties to add tie stitches to designs or embroidery alphabets that already contain manually digitized tie stitches will double them up. Doubling tie stitches will often cause thread breaks and/or mistrims.
Do not use object properties to designs or embroidery alphabets that already contain manually digitized tie stitches.
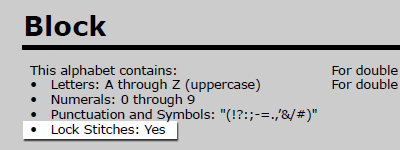
Before adding tie stitches, look for manually digitized tie stitches in older files like those described above. If using embroidery alphabets (EA) in DesignShop, check the code sheets to prevent doubling tie stitches. As only some of the alphabets contain tie stitches, this is an important step in creating smooth-sewing lettering.
Removing Digitized Ties From Alphabets
The manually digitized tie stitches on the older embroidery alphabets may be removed so that object properties may be used on all the alphabets in DesignShop. To do that, go to the menu and select .
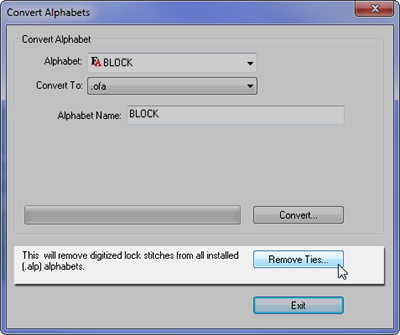
From the Convert Alphabets window, click on to remove the manually digitized tie stitches from all of the installed alphabets.
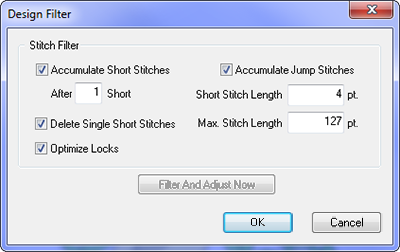
Use the Design Filter to Optimize Locks
Both DesignShop and AMAYA OS contain a design filter that will allow you to easily optimize the locks (tie stitches) of a design. It will scan through a design and remove tie stitches, if there are any, and replace them with style 1 ties. The design filter works well for both wireframe and stitch files.
Use the design filter to address tie stitches in problematic files.
To use this filter in Design Shop, go to , then , and select . In the design filter window, check "Optimize Locks". Next click . Click to close the window.
For AMAYA OS, go to , then select . In the design filter window, check "Optimize Locks". Click and load the design again for the filter to work. Once checked, the filter will stay on until unchecked. This means that every design to be loaded in AMAYA OS will be filtered and have the locks optimized. This is a good option if you are uncertain how to handle tie stitches.