Setting up designs for caps requires a few considerations. Make sure that the design is of an appropriate size for the profile of the cap and ensure that the sew path will not creating ripples, thread breaks, needle breaks, or registration issues. Consider the following when designing for caps.
Design Size for Caps
The cap frame that you are using will most likely handle a much larger design than the cap itself. The size of a design that is able to be sewn on a cap depends on the profile of the cap itself. Higher profile caps can accommodate much larger designs than lower profile caps.
As designs sew toward the top of the cap, the inside of the cap can brush the lower arm of the machine and restrict cap movement. This can cause some distortion and cause vertical lines to appear as if the tops move in toward the center of the cap. If the design sews even farther up on the cap, the pressure of the lower arm against the inside of the cap can cause the cap to be pushed off the frame.
To figure out how large of a design can safely fit on the cap,
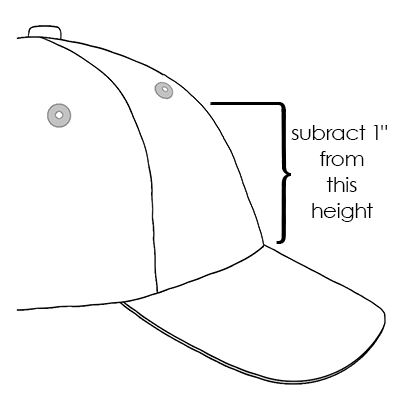
- Measure from the bill to where the cap really starts to curve over the head of the potential wearer. This will require a little bit of judgment.
- Subtract one inch from that measurement to find a fairly safe design height. Stay within this size if the design contains right angles, borders, or fine details.
- If the design is more organic and contains few borders or details, the size can slightly (≈½") exceed the safe area calculated in the step above. However, some trapezoidal distortion may be noticeable.
- The width of the design depends on the cap frame.
Sew Order for Cap Designs
Now that you have the size of the design figured out, the design needs to be digitized for a cap.
One of the challenges with embroidering caps is that the fabric moves and flags. The trick to sewing caps successfully is to use the design sew order to move the material where it can to little harm.
For cap designs, follow these three guidelines.
- Sew from the bottom (bill) toward the top (crown).
- Sew from the center (seam) toward the sides.
- Finish elements as you go. While less efficient, completing designs in smaller portions will help keep a tighter registration and help outlines and borders line up.
In embroidery, it is often a good idea to avoid sewing toward an anchor point. If the material is anchored to the backing or another element of the garment, like the bill of a cap, it will not move. Sewing toward one of these anchors can push a ripple of material. Once the anchor point is reached, the excess material has no place to go and a ripple is sewn into the garment.
Sew From the Bill Toward the Crown
The bill of the cap poses a bit more of a challenge if the material is stiff. A ripple of material formed from sewing toward the bill of a cap can deflect a needle and cause thread breaks and needle breaks.
Sew From the Center Toward the Sides
Digitizing the sew path to sew away from the bill and away from the center seam will help maintain design registration and avoid thread and needle breaks.

"Finish Elements As You Go"
Finishing elements as you go will mostly help with registration. For example, if you were setting up a design of lettering with borders, try sewing a letter or two and then bordering them. Sewing the whole word and then all the borders may sound more efficient, but it can result in material push and registration loss.