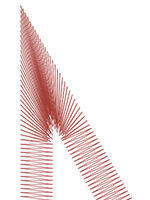
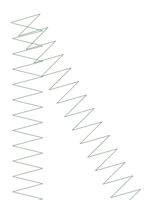
The problem arrises as stitches navigate around corners. It can be common for them to bunch up and cause puckering, thread breaks, and even holes in the garment. Notice the dark area of stitches in the example. Such tight stitching is problematic.
Changing how the stitches handle the tighter angled corners can smooth these problems out.
Look at the following examples to prevent sewing issues in the corners.
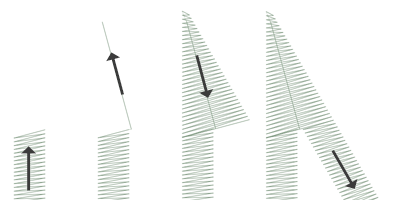
Capping the Corners
Capping the corners is a way to keep the stitches in a consistent direction and maintain an even stitch spacing. The drawback of capping comes from the limited range of use. Larger corners should not be capped as longer satin stitches are prone to snagging and becoming loose. Try to avoid creating satin stitches longer than 6 - 7 millimeters in length.
To cap a corner,
- Use a satin stitch element to sew to the inside edge of the corner.
- Use a walk stitch to travel to the tip of the corner.
- Use a second satin stitch element to sew back to the inside edge of the corner.
- Use a third satin stitch element to sew the last leg of the corner.
Mitering Corners
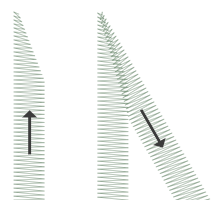
Mitering corners is another way to keep the stitches in a consistent direction and maintain an even stitch spacing. Mitering works well for less extreme angles and wider satin stitches.
To cap a corner,
- Use a satin stitch element to sew to the inside edge of a corner. Continue the element but taper the end from the inside of the corner to the point. Be sure to leave enough of the edge under the corner to create an overlap with the second element.
- Use a second satin stitch element to sew from the point to continue to the second leg of the corner. The inside edge of the element should create a seam from the tip of the point to inside of the corner.
Variations On Miters
Miters can and should be altered to adapt the size of the design and the application. A complete overlap may work well for smaller elements that do not have the room to taper before becoming smaller than a needle. This is also typical of traditional tackle twill tack-down stitches.
This type of corner is also common on small lettering.
Corners On Singleline Elements
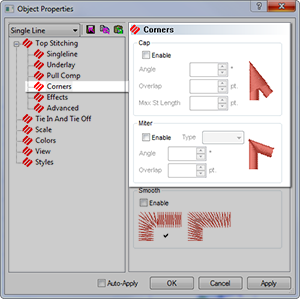
Singleline column elements have a "Corners" property. This object properties submenu will allow you to choose how that element handles corners.
You can choose to have the corners cap or miter. With miter, you have the option of type 1 or type 2. Type 1 is the miter that comes to a point. It is the first example of a miter shown above. The example shown under "variations" is a type 2 miter.
With the cap and the miter, you can choose at what angle the special corner should occur. You can also choose an overlap amount.
The "Corners" property is available in the higher levels of DesignShop.