The density of the stitches in a design can also lead to thread breaks. This usually occurs from one of the following.
Density Setting is Too Tight
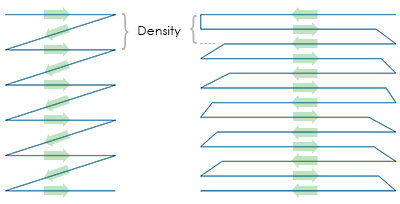
The density setting in DesignShop represents the distance between stitch lines going the same direction. In some ways, it may be helpful to think of it as stitch spacing. The larger the number is, the farther apart the stitch lines will be.
If the stitches are too close together, it can cause friction and thread breaks as well as causing rippling and poor sew quality.
What is an Ideal Density Setting?
Density settings will need to be changed to accommodate different stitch types and applications. Finding an appropriate setting may take some experimentation. Good starting points are found in the software.
For satin stitches:
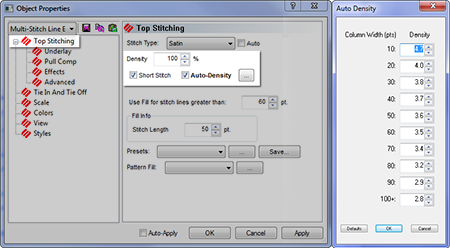
Consider using "Auto Density". Auto density is a setting that will vary the density based on the length of the stitch lines. The longer a stitch is, the more is stays up out of the material. For that reason, longer stitches or wider columns often require tighter densities with the stitches closer together. This keeps the stitches even and looking nice.
For fill stitches:
One density setting should work well throughout a fill. Fill stitches are usually comprised of a series of identical stitch lengths. A standard density setting of 3.8 points should work fairly well as a starting point for most fills. This setting may need to be adjusted for different stitch lengths, fill patterns, and applications.
Specialty threads and applications often require altering density settings. The manufacturers' websites are good places to find recommended design and sew settings.
Too Many Layers of Stitches
Building up multiple layers of stitching can also lead to density issues. Too many stitches packed into one place can create a tough or stiff patch of stitches. This will often lead to friction and thread breaks as another layer of stitching is applied on top.
In designs that require layers of stitches, each layer will need to have a lighter density setting so that when all the layers are built up, they reach an overall stitch density close to that of a single normal fill.
Needle Penetrations are too Concentrated
If multiple design elements line up in one area, it can create a concentration of needle penetrations. This concentration can create holes in a garment as well as thread breaks.
Avoid overlapping design elements with needle penetrations that are concentrated in a small area.
Stitch Proximity Plot
DesignShop can plot out the needle penetrations and color code the concentrations. To use this tool, go to > > . Then, hide the stitches in your design. Behind the design you will see the proximity plot. It resembles a weather map. The dark areas are your possible trouble areas, and the lighter areas should give you little trouble.
Stitch Proximity Filter
The Stitch Proximity Filter will slightly adjust the needle penetrations in the most concentrated areas to help alleviate the troublesome areas in a design. To use the filter, go to > > .
Using this filter will convert all wireframe data to expanded, making future editing or scaling difficult.