Unless you hooped absolutely perfectly, and that is exceeding difficult to do, you will most likely need to adjust the hoop position on the machine to better center the design on your cap.
The best way to accomplish this is to have the hoop loaded on the machine first.
- Screen Versus Cap
- Centering Vertically
- Centering Horizontally
- Trace the Design
- Watch the Hoop Limits
Screen Versus Cap
Pressing the Hoop Center icon or commanding it from the keypad of the AMAYA is convenient, but it doesn't work well for caps. It functions by centering the hoop or frame to the machine.
AMAYA OS will display the frame limits. Centering the design within these limits will not necessarily center the design on the cap. Because caps have different profiles and embroiderers hoop inconsistently, small adjustments may need to be made to the hoop placement.
When the design is centered on the cap, the placement may appear to be off in AMAYA OS.
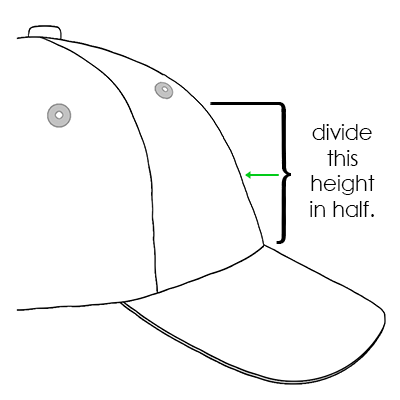
Centering Vertically
Centering the design vertically will take a bit of measuring, but it only needs to be done once for a particular style of cap. Additional caps will not require vertical adjustments.
To find an appropriate vertical placement on the cap, measure from the bill of the cap to where the curve really starts to come over the head. This is similar to measuring the design height that the cap can accommodate. Once measured, divide the measurement in half. Measure up from the bill that half distance to find a good vertically centered placement for the design.
Marking this measurement on the cap with masking tape or tailor's chalk works well. Use the hoop and up or down arrows to move the hoop into position. As you use these keys, the AMAYA laser will illuminate the placement.
Centering Horizontally
With the cap frame loaded on the machine, use the Hoop Key and the left or right arrow on the AMAYA keypad to center the cap horizontally. If the cap has six panels, you will have a seam running down the middle of the front. This acts as a marker for center. If the cap has five panels, it will not have a seam, and you may need to use a tape measure and tailor's chalk to find center.
Using the laser to line up to center may not work as well in this case. As the cap comes of the needleplate, the laser is displayed farther to the right. This is from the laser being set just behind the right upper arm front cover of the machine.
For a more accurate placement, line up the active needle (the needle with the presser foot behind it).
Trace the Design
Tracing the design using the hoop and trace keys simultaneously on the keypad of the AMAYA will also give you a good idea of where the design will be sewn.
Watch the Hoop Limits
Depending on the structure of the cap, you will be able to sew within varying distances from the hoop limits. Softer, thinner, and more pliable materials will allow you to sew closer to the limit. Tougher and less flexible materials may cause the fabric to ramp up at the teeth causing flagging, needle deflection, and thread or needle breaks.