![]()
|
|
This repair requires timing and other adjustments and should be performed by a Melco authorized service technician. |
The x-home sensor is installed inside the x-beam. It requires replacement when it gets too dirty or if the cable attached to it is damaged in any manner (chaffing, pinched wires, shorts or breaks). The x-home functionality can be verified by moving the x-carriage right and left and watch the LED on the main PCB at location D37. The LED should come on just as the carriage reaches the "x-home" position and go off when the carriage is moved further left or right.
Replacement Part Needed:
X-home optical switch assembly
3.2mmIDx9mmODx.8mmTHK fender washer
M3x0.5mmx10mmLG cap head socket screw
Replacement Procedures:
1. This procedure is done with the machine turned ON. However, engage the emergency stop by pushing ![]() in.
in.
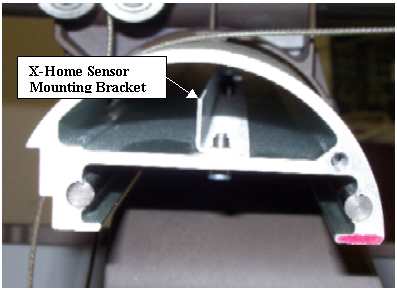
Figure 1 - X-Home Sensor Mounting Bracket
2. Remove the x-beam end cap from the left end of the x-beam.
3. Disconnect the x-home sensor cable from the x-y optical sensor PCB.
4. Move the x-carriage all the way to the right as far as it will go.
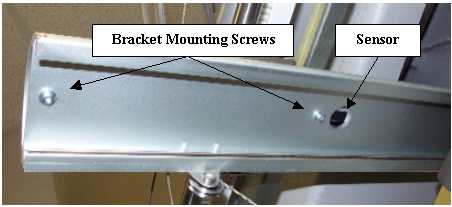
Figure 2 - X-Home Sensor and Mounting Screws
5. Remove the screws mounting the x-home sensor mounting bracket to the beam. The screws are located on the bottom side of the beam as shown in Figure 2 above.
6. Slide the x-home sensor mounting bracket out of the beam, carefully pushing the cable through the access hole at the top of the beam. Do not allow the cable to rub on the edge of the access hole as you pull it through.
7. Remove the defective x-home sensor from the mounting bracket.
|
|
CAUTION!! DO NOT use loctite on the screw mounting the x-home sensor to the mounting bracket. Loctite is corrosive to plastic and will damage the sensor.
|
|
|
CAUTION!! DO NOT over tighten the screw mounting the optical sensor to the mounting bracket. You will either strip the threads or crack the sensor housing if you do so. |
8. Run the x-home sensor into the access hole at the top of the beam and pull it out the end of the beam, mount it to the bracket and tighten the screw just enough to hold the sensor securely.
9. Slide the x-home sensor assembly (sensor and bracket) back into the beam and tighten the two bottom mounting screws just enough to hold the assembly in place.
10. Set x/y home using the procedures prescribed in "X/Y Home Adjustment".
![]()