![]()
The thread sensor assembly has to be replaced when diagnostic tests indicate it has failed. Symptoms such as inconsistent thread feed, inconsistent thread tension, and an increase in tension can be related errors during embroidery operations.
|
|
CAUTION!! Handle the thread sensor assembly carefully. The wiring is extremely fragile to handling. Although this assembly is resistant to electrical static discharge (ESD) damage, use normal precautions when handling electrical components. Parts that are damaged due to mishandling are not covered under the machine warranty.
|
|
|
CAUTION!! DO NOT allow the PCB or bracket to hang by the wires. Support the weight of the PCB during installation or removal. |
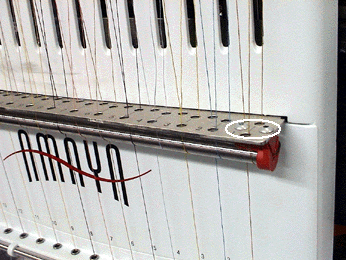
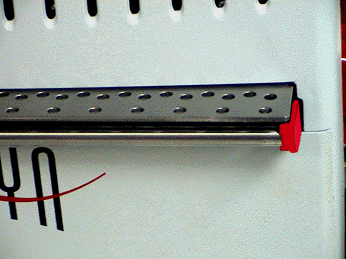
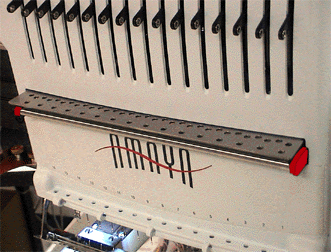
There are two thread sensors in the field, the 2002/2003 model and the 2004 model. The removal procedures for these sensors are slightly different. Before proceeding, use the images below to determine which thread sensor you will be removing (notice that the 2002/2003 model has 4 button head screws on top of the thread sensor base).
|
|
|
Replacement Parts Needed:
If you will be replacing a 2002/2003 model, you will need to replace the thread sensor assembly (sensor, base, and button head screws), needle case access cover assembly, and needle case cover assembly. The upgrade kit Melco PN: 32817 includes these parts.
If you will be replacing a 2004 model, you will only need to replace the thread sensor assembly Melco PN: 32818.
Note that the 2004 thread sensor assembly is shipped glued together for easier installation (see the figure below). Also note that the thread sensor assembly is shipped with the hardware installed. Before proceeding with the installation, remove the two hex nuts from the assembly (leave the two M4 screws in place).
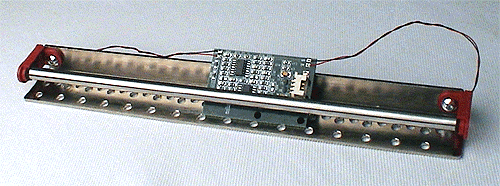
If the assembly is loose (no longer glued together), you may want to re-assemble with tape, seating each bracket boss into the thread guide holes.
Remove the needlecase access cover.
Remove any thread from the needlecase.
Remove the needlecase cover.
Remove the two M3 nuts mounting the thread sensor PCB to the needlecase and remove the PCB.
Use a piece of string or light wire and tie the PCB to the center of the thread sensor base. Do not allow the PCB to hang by the wires that are soldered to it.
Remove the two button head screws mounting the thread sensor base to the needle case and remove the thread sensor assembly and base.
Avoid handling the thread sensor bar itself and mount the replacement thread sensor assembly and base in the same position as the old one that was previously removed.
Mount the base and thread sensor assembly using the two M4x8mm button head socket screws attached to the thread sensor assembly and tighten the screws to Melco Torque Specifications.
Mount the thread sensor PCB in position with two M3 nuts and tighten to Melco Torque Specifications.
If there is no other work to be done on the needlecase, reinstall the needlecase cover and the access cover assemblies. (Please note if you are replacing a 2002/2003 model with a 2004 model, install the new cover assemblies provided in the upgrade kit).
![]()