![]()
This procedure is required whenever the needle case has been removed and re-installed. Calibrating the needle case requires a rough calibration and a fine calibration. The rough calibration is done with the Needle Plate removed and the needle is aligned to the Rotary Hook Canter Post. The fine calibration is performed with the Needle Plate installed and the needle is aligned to the center of the needle hole.
Rough calibration procedure:
1. Make sure the AMAYA-OS is up on your computer screen and your AMAYA machine is ON.
2. Remove the Bobbin Case Assembly and the Needle Plate.
3. In the AMAYA-OS, click on the Maintenance tab as shown below.
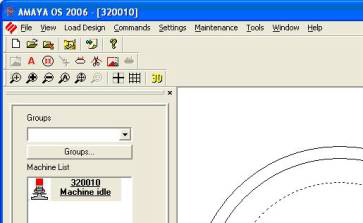
Figure 1: Maintenance Tab
4. Next, click on the Steppers tab as shown below
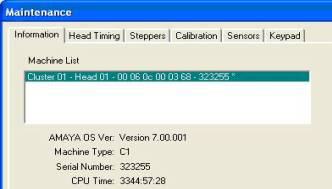
Figure 2: Steppers Tab
5. Next, click on the Color Change - Home button as shown below. This will move the needle case to the home position and finally come to rest at needle position 1.
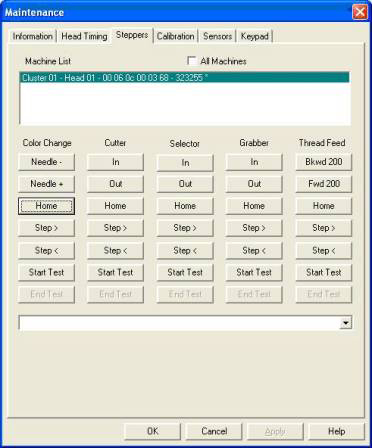
Figure 3: Color Change Home
6. Next, click on the Calibration tab as shown below.
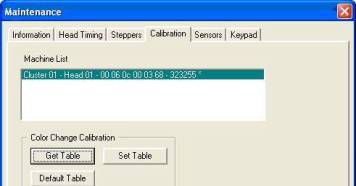
Figure 4: Calibration Tab
7. Lower the needle to the Needle Depth position by holding down the Adjust ![]() button and then pressing the Down Arrow
button and then pressing the Down Arrow ![]() .
.
8. Check to see where the needle is in relation to the rotary hook center post.
a. It will help to use a flashlight and/or magnifying glass.
b. It is also very critical that you observe the needle from directly in front of the hook. If you are looking from even a slight angle, it may cause you to incorrectly calibrate the needle position.
9. Determine how far to the left or the right the needle needs to be adjusted.
10. Move the needle to the Head Up position by holding down the Adjust ![]() button and pressing the Up Arrow
button and pressing the Up Arrow ![]() .
.
11. Micro-step the needle the distance and direction determined in the previous observation step.
a. Micro-stepping is done by hitting the Trace ![]() button and the Left
button and the Left ![]() or Right
or Right ![]() arrow, depending on the intended direction.
arrow, depending on the intended direction.
12. Each time the arrow is pressed, the needle case moves 8 one-hundredths (0.08) of a millimeter which is equal to 0.003 inches.
13. Lower the needle to the Needle Depth position.
14. Observe the relationship of the needle to the rotary hook center post.
15. If further adjustments are necessary, repeat steps 7-13.
16. If the needle is centered exactly to the post then you may move to the next needle.
17. Using the Frame-Back key is the quickest way to get to the next needle in this situation. It will bring the needle to the Head Up position, move to the next needle, and bring that needle to the Needle Depth position.
18. From there, you can repeat Steps 7-13 as needed until all 16 needles have been centered.
19. Upon completion of the 16 needle calibrations, hit the “Get Table” key in the AMAYA-OS. By hitting this key, you will be storing a backup copy of the calibration table in the computer.
Fine Calibration Process:
1. Loosely install the Needle Plate.
2. Hit the Frame-Back key to go to needle position 1.
3. By hand, align the Needle Plate so that needle 1 is in the center of the needle hole. Then tighten both needle plate screws; being sure not to nock the Needle Plate out of alignment.
4. Hit the Frame-Back key to move to the next needle.
5. The machine will now be at Needle Depth with the next needle position ready to be calibrated. As was done in the rough calibration, observe the position of the needle and figure out how it needs to be adjusted in order to get it in the center of the needle hole. It may already be in alignment from the Rough calibration in which case you may go to Step 8.
6. Move the machine to the Head Up position Micro-step the needle the distance and direction determined in the previous observation step.
7. Lower the needle to Needle Depth and check its position.
8. If further adjustment is needed, raise the machine to Head Up and repeat steps 5 thru 7.
9. If the needle is centered, hit the Frame-Back key and move to the next position.
10. Repeat this process for the remaining needles.
11. Upon completion of all 16 needles, hit the Get Table button in the AMAYA-OS as shown below.
Figure 5: Get Table Button
12. Close out the Maintenance menu in the AMAYA-OS as shown below.
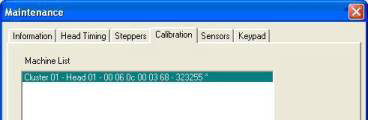
Figure 6: Maintenance Close-Out