![]()
|
|
This repair requires timing and other adjustments and should be done only by a Melco authorized service technician. |
The x-drive cable should be replaced when excessive wear and tear or fraying of the cable is noticed. It is critical that the instructions given for the replacement of the x-drive cable be strictly adhered to as improper installation, especially tensioning, of the x-drive cable will lead to failures very difficult to troubleshoot, especially in the x/y registration during embroidery operations.
If you tension the x-drive cable too high, it will cause premature wear on the x-axis servo motor and will cause problems with the x-axis registration. Typically, the symptoms of an x-cable tensioned too high will be narrow stitch length on x-axis stitching.
If you tension the x-drive cable too low, it will cause problems with the cable slipping on the pulleys, increase the amount of time it takes the x-motor to move to specific positions. Typically, the symptoms of an x-cable tensioned too low might be x-move timeout, x-tracking error, or stitch length too long on the x-axis.
|
|
CAUTION!! Use extreme care not to damage the cable and protective coating during assembly. If the protective coating is damaged, the cable will wear out very fast impacting the quality of the sew outs. |
|
|
CAUTION!! At any time when the machine is either powered down or in E-Stop mode, neither the X- nor Y-carriage should be moved at a high rate of speed. If there is a desire to manually move either carriage, it should be pushed or pulled GENTLY to prevent serious damage to the main control board. |
X-Cable Removal:
2. Remove the left and right upper arm covers.
3. Remove the left and right transparent arm covers.
4. Remove the upper arm back cover.
5. Move the x-carriage all the way to the right until it comes to a hard stop. All references to the windings of the x-cable and other adjustments will be based on the x-carriage being positioned all the way to the right at a hard stop.
6. Wrap tape around the windings of the cable on the x-drive cable spool to keep the cable from slipping off the spool and to keep the windings on the spool correct.
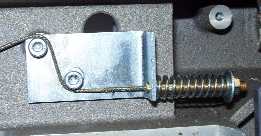
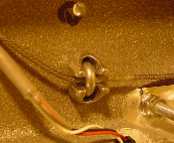
Figure 1 - Cable Tensioner Bracket
7. Start on the left side of the machine and loosen the hex nut on the x-cable tensioning bolt slowly and then remove it. Hold onto the cable as you do this and do not let it drop.
8. Remove the cable tensioner spring and the two fender washers from the cable tensioning bolt.
9. Pull the cable through the access hole to the back of the machine body, off all of the pulleys and let it hang loose in the back.
|
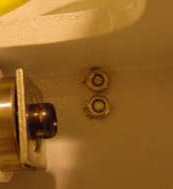
Figure 2 - X-Cable Clamp Screws (Left Side of Machine on Back of Sewing Head) |
Figure 2 - X-Cable Clamp (Right Side) |
10. Loosen the screws located on the back side of the upper arm right front enough to loosen the right cable and unwind the cable from around the cable clamp.
11. Pull the cable through the access hole on the right side of the sewing head, from around each of the pulleys, and let it hang on the back side off the x-drive cable spool.
12. Loosen the screw located on the inside of the x-drive cable spool from the back and remove the cable and spool from the machine.
13. If you are going to reinstall the cable later, place it in a box or something to protect it from damage. If you damage the protective coating, the cable will fray and eventually corrode.
![]()