![]()
|
|
This repair requires timing and other adjustments and should be performed by a Melco authorized service technician. |
Replacement Parts Needed:
Reciprocator Repair Kit
2. Remove the left and right upper arm covers.
3. Locate the reciprocator assembly as shown below.

Figure 1 - Reciprocator Assembly Installed
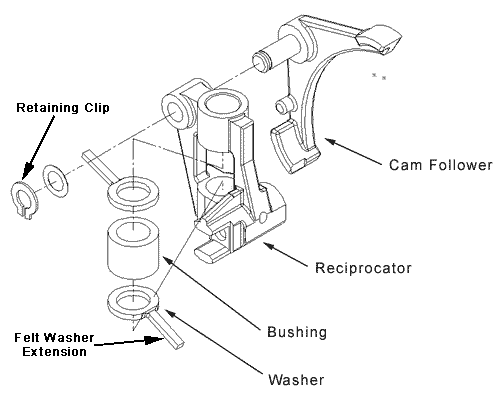
Figure 2 - Reciprocator Assembly
4. Remove the two screws that hold the retaining finger in place.
5. Loosen the set screws at the top and bottom of the head that secure the reciprocator guide shaft.
6. Remove the reciprocator guide shaft by sliding it up and through the hole at the top of the upper arm casting.
7. Remove the reciprocator assembly from the connecting rod by pulling it straight out of the upper arm casting.
|
|
Note: When any component in the reciprocator assembly requires replacement, it is strongly recommended replace the entire reciprocator assembly. |
8. Install the reciprocator guide shaft as follows:
a) Attach the connecting rod to the reciprocator.
b) Insert the guide shaft down through the hole at the top of the upper arm casting and through the presser foot guide.
c) Insert the guide shaft through the reciprocator assembly.
d) Insert the guide shaft down through the ball bearing, the bushing below the ball bearing, and the bottom felt.
9. Turn the reciprocator guide shaft until the flat position at the top of the shaft faces towards the front of the upper arm casting.
10. Pull the reciprocator guide shaft down until it is positioned below the upper surface at the top of the upper arm casting by 0.5 to 1.0mm.
11. Position the z-shaft at top dead center, (to allow the felt to capture the oil in the next step) by turning the machine on without the AMAYA software loaded. The machine will automatically go to top dead center (assuming that the z-shaft drive is properly timed). If the AMAYA software is loaded, close it before performing this step.
12. Add approximately 15-20 drops of machine oil into the oiling hole located just above the reciprocator assembly while the reciprocator is in the upper position.
13. Tighten the set screws on the top and bottom of the head to secure the reciprocator guide shaft and assembly.
14. Install the left and right upper arm covers.
![]()