![]()
|
|
WARNING!! This procedure is intended to be performed only by specially trained Melco service technicians and personnel. Disassembly by untrained individuals will void any warranty protection and can result in personal injury or damage to the machine.
|
|
|
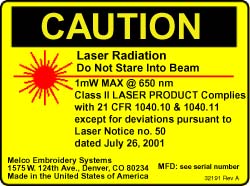
WARNING!!! DO NOT allow the laser beam to be aimed at yours or anyone else's eyes. The laser emits a very concentrated light beam that can cause permanent blindness. Use extreme care in handling the laser assembly to make sure it is not going to be inadvertently aimed at someone's eyes or face. DO NOT LOOK DIRECTLY AT THE LASER LENS WHILE IT IS ENERGIZED! |
Replacement Parts Needed:
1 inch laser assembly
Replacing the laser assembly:
Color change to Needle 1 and then engage the E-stop button.
|
|
WARNING!! DO NOT proceed past this point until the e-stop button has been engaged. Failure to do so can cause personal injury or damage the machine. |
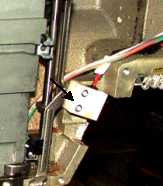
Figure 1 Laser Assembly Installed
|
|
CAUTION!! Do not touch the metal laser housing to the casting. Do not ground the laser housing to other metal components. This will damage the laser. |
Remove the upper right front cover and set the four M4x8mm flanged head socket screws and one M4x6mm button head cap screw aside for reuse.
Loosen the two M3x16mm socket head cap screws mounting the laser mounting block to the machine casting(do not remove them).
Pull the laser body carefully out of the white laser mounting block.
Check the focus of the laser light by aiming the light at a flat surface about 10 feet away and safely away from other people. The dot should be sharp and round, not blurry or oblong. If the laser light is out of adjustment, it must be adjusted by a specifically trained Melco service technician. If the light is defective, replace it with a new one.
Insert the laser body into the white laser mounting block and center it inside the block.
Disengage the E-stop button on the user interface.
Place a round dot or piece of tape over the needle plate hole. Take the machine to needle depth and then back to head up (this is to make the focus point of the laser easier to see).
|
|
CAUTION!! Do not color change with the upper right front cover removed! |
Adjust the position of the laser mounting block so that the laser beam is focused and centered on the needle plate hole. You can turn the laser on by pressing the laser key on the user interface.
|
|
Note: Ideally, if the laser beam is focused perfectly, the laser beam should be focused inside the circumference of the needle plate hole and not touch the sides of the needle plate hole. While this is the ideal standard for adjusting the laser beam, it is more important that the laser light is centered as perfectly as possible over the center diameter of the needle plate hole. |
When the laser beam is centered as perfectly as possible on the needle plate hole, hold the mounting block securely in place and tighten the screws to Melco Torque Specifications.
Reinstall the upper right front cover.
![]()