The Hoop Manager allows you to view information on the pre-defined hoops commonly used with the AMAYA and other embroidery machines. The Hoop Manager also allows you to create user-defined, custom hoops.
NOTE: With your machine type set to Amaya, some hoops are turned off. To see all hoops, go to the Customize Hoop List button and turn the hoops on.
To access the Hoop Manager, select Tools->Hoop Setup (in Design View, you can also right-click the Hoop Manager button ![]() ).
).
|
|
Tip: You have the option of changing the measurement units displayed by the Hoop Manager. To do this, select Tools->Options, then click the Measurements Units tab. Here you can select inches or cm for Hoops. |
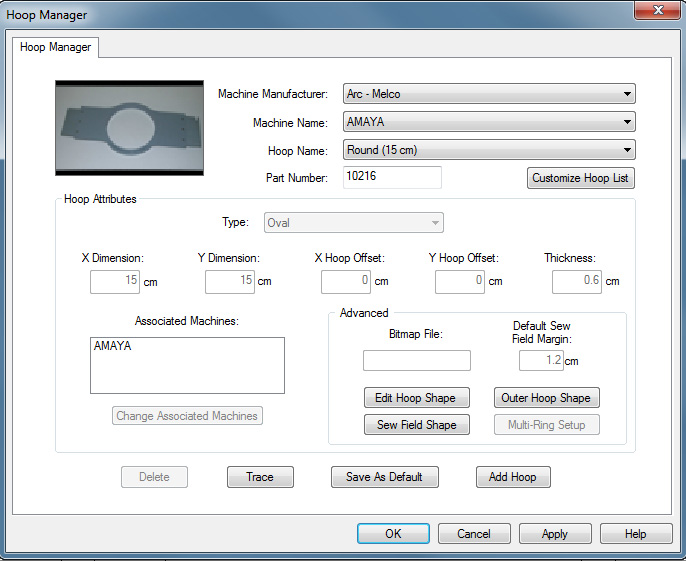
The Hoop Manager stores and displays the following information about pre-defined hoops. This information cannot be changed.
Machine Manufacturer: The Machine Manufacturer list displays several embroidery machine manufacturers. (Click the pull-down arrow to display the list, then left-click a manufacturer to select). The selected manufacturer will determine which machines are shown in the Machine Name list.
Machine Name List: The Machine Name list displays the machines produced by the selected manufacturer. For example, the AMAYA will only appear in the Machine Name list when ARC - Melco is selected as the manufacturer. (Click the pull-down arrow to display the list, then left-click a machine name to select). The selected machine will determine which hoops are available in the Hoop Name list.
Hoop Name: The Hoop Name list displays which hoops are associated with the selected machine. To change which hoops are displayed in this list, click the Customize Hoop List button (located directly under the Hoop Name pull-down menu). This will display the following dialog:
When the checkbox next to a hoop name is checked, the hoop will be displayed in the list. To hide a hoop name in the list, uncheck the hoop’s corresponding checkbox. When you click OK to close the dialog and display your changes, the hoop will not be visible in the list. To display a hoop that has been hidden, simply check its corresponding checkbox in this dialog.
NOTE: The 15cm / 5.9 inch hoop will not be available in this dialog because it is the default displayed hoop.
Part Number: This shows you the part number of the hoop you have selected.
Hoop Attributes: When a hoop is selected (click the pull-down arrow to display the list, then left-click a hoop name to select), that hoop's attributes will be displayed. These programmed dimensions will be grayed out; this information cannot be changed.
Hoop Type: the type of the selected hoop (rectangular, circular, square, etc)
X Dimension: the width of the hoop from left to right (measured from the outside edge of one side of the inner hoop to the outside edge of the other side of the inner hoop)
Y Dimension: the height of the hoop from top to bottom (measured from the outside edge of one side of the inner hoop to the outside edge of the other side of the inner hoop)
X and Y Offset: the distance from the machine origin to the hoop center
Hoop Thickness: the width of the outside edge of the hoop wall to the inside edge of the hoop wall
After selecting a hoop, you can click the Trace button and AMAYA OS will trace your design and give you a message that tells you whether or not your design fits in the selected hoop
|
|
Note: The hoop that is selected in the Hoop Manager does not change the hoop selected in the AMAYA OS Hoop Selection menu. (Unless you click the Save As Default button to save the selected hoop as the default hoop in AMAYA OS. The next time you open AMAYA OS, this hoop will be the selected hoop in the Hoop Selection menu (and will be displayed in the View Window). |
Click OK to close the Hoop Manager dialog.
Complete the following steps to create a custom hoop in AMAYA OS.
Make sure AMAYA is selected in the Machine Name pull-down menu (Arc - Melco must be selected as the Machine Manufacturer).
Click the Add Hoop button in the Hoop Manager window. Type in a name for the new hoop and click OK.
Select a hoop shape from the Hoop Type pull-down menu.
Enter the attributes of the new hoop in the Hoop Attributes area.
Hoop Type: the type of the selected hoop (rectangular, circular, square, etc.)
X Dimension: the width of the hoop from left to right. This measurement should be from the outside edge of one side of the inner hoop to the outside edge of the other side of the inner hoop (see image below).
Y Dimension: the height of the hoop from top to bottom. This measurement should be from the outside edge of one side of the inner hoop to the outside edge of the other side of the inner hoop (see image below).
Hoop Thickness: the width from the outside edge of the inner hoop to the inside edge of the inner hoop (see image below). If you do not enter a hoop thickness, the Hoop Manager will use a default thickness of 65 points.
NOTE: Some hoops (such as Fast Frames) consist of a single frame rather than an inner and outer hoop. To measure the hoop thickness of this type of hoop, measure the thickness of the frame as shown in the example hoop below. To obtain the X dimension, measure the outer edge of the frame horizontally (left to right). To obtain the Y dimension, measure vertically (top to bottom) as shown in the following image. Notice that the Y dimension is not measured to the edge of the bracket.
X and Y Offset: the distance from the machine origin to the hoop center. It is necessary to enter offsets when the hoop center is not aligned with the machine origin (the needle plate hole). Offsets will align the hoop center to the machine origin. Please note that you will not always need an X and Y offset; for example, in many cases, only a Y offset is needed.
To measure for offsets, you must first select a pre-defined hoop (e.g., 15cm) from the Hoop Selection menu in AMAYA OS, then click the Hoop Center button ![]() . Then attach the hoop you are defining to your machine.
. Then attach the hoop you are defining to your machine.
To measure for the X offset, measure the horizontal distance (in inches) from the hoop center to the needle plate hole. If you need to move the hoop center to the left (your left as you face the machine), enter a negative number for this value.
To measure for the Y offset, measure the vertical distance (in inches) from the hoop center to the needle plate hole. If you need to move the hoop center toward the machine, enter a negative number for this value.
After you enter the hoop attributes, the Hoop Manager will have the information needed to create the new hoop. Click OK to save your changes and close the Hoop Manager dialog. The new hoop will now be available from the Hoop Selection menu in AMAYA OS. (Click here for information on Advanced Settings).
When the hoop is displayed in the View Window of AMAYA OS (the hoop will be displayed when selected in the AMAYA OS Hoop Selection menu), you will see two solid lines and a dashed line.
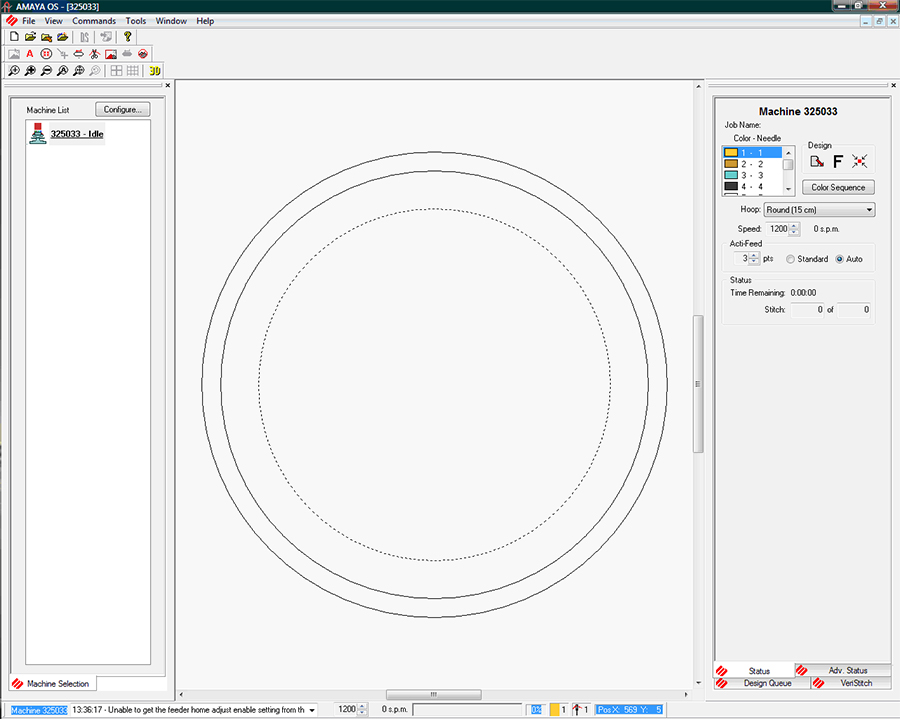
The outer solid line represents the outer edge of the inner hoop (drawn based on entered X and Y dimensions). The inner solid line represents the inner edge of the inner hoop (the Hoop Manager determines this by doubling the hoop thickness, then subtracting this from the X and Y dimensions). The dotted line represents the sew field for the defined hoop. The Hoop Manager determines the sew field from the value in the Default Sew Field Margin box. If you have not changed this value, the sew field will be 126 embroidery points (approximately 0.50 inches) from the inner edge of the inner hoop (the inner solid line). You can change this to any desired value, and this value will be saved with the hoop.
Associated Machines - To change the machine(s) associated with the new hoop, click the Change Associated Machines button in the Hoop Manager Properties dialog. To select a machine, left-click the machine name, then click (>). [To select all machines click (<<)]. Click OK when you are finished selecting machines.
You can enter an image file name (in the Bitmap File box) if you have an image of the new hoop. This image will be displayed in the main Hoop Manager window. (The ideal size for this image is 1.3 inches wide x 0.82 inches tall). After you type the name of the image in the Bitmap File box, copy the image file into the following directory (AMAYA Install Directory\System\Bitmaps).
Click OK or Apply when you have completed your changes.
When creating a custom hoop, the shape of your hoop may not be available from the Hoop Type menu. If it is not, you will need to create a custom hoop shape. In our example, we will create a rectangular hoop with round edges that is 11 x 8.5 inches (28 x 22 cm). To create a custom hoop shape:
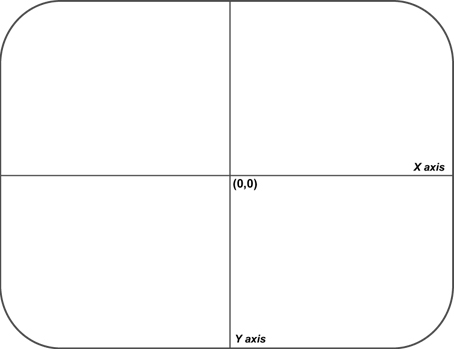
Now you need to determine the points you are going to enter in the Hoop Manager . On the traced hoop, draw up to 32 points all the way around the hoop. You must place a point at any location where the X/Y axes intersect with the hoop outline (see the following image).
The more points you choose to enter, the smoother the drawing of the hoop will be onscreen. Try to place as many points as you can on any curved areas of your hoop. (The following image displays 28 points selected to enter for our example hoop. Notice how most of the points are clustered at the curves of the hoop).
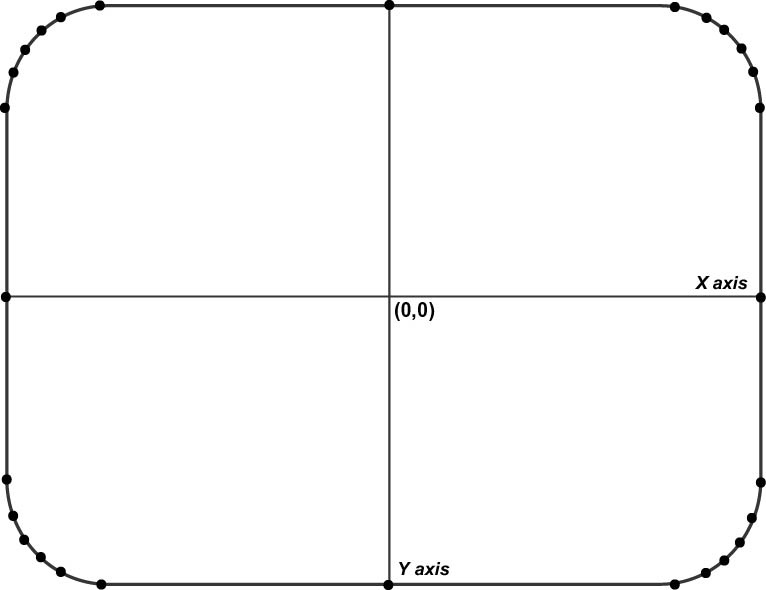
Now you need to measure the distance from each point to the hoop center. You can take these measurements in inches or centimeters. For each point you will need to take two measurements: the horizontal distance from the hoop center (0,0) and the vertical distance from the hoop center. Note that the closer the points are together, the more exact your measurements should be.
Once you have these measurements, you will need to determine the coordinates of each point in embroidery points. For the X coordinate, multiply the horizontal distance by 254 if measured in inches or by 100 if measured in centimeters. If the point is to the left of the hoop center, the coordinate will be a negative number. Repeat this for the Y coordinate (vertical distance). If the point is below the hoop center, this coordinate will be a negative number. After calculating the embroidery points, round them to whole numbers. You will now have the coordinates needed to enter in Hoop Manager.
See the following image for examples of these measurements (note that distances were measured in inches).

Click the Add Hoop button in the Hoop Manager Properties dialog. Enter a name for the new hoop and click OK.
Click the Edit Hoop Shape button. You will see the Hoop Shape Definition dialog.
In this dialog you will enter points to plot the shape of your hoop. After you have calculated all of your points, you can enter them in the Hoop Manager. In the Hoop Shape Definition dialog, select Custom Shape from the Hoop Type pull-down menu.
In the Number of Points text box, type the number of points you will be entering. Once you type this number, the coordinate text boxes will no longer be grayed out.
You can now type in the coordinates of your points, beginning with the lowest point (type this point in the X1 and Y1 boxes). If you have more than one lowest point, enter the point that is farthest to the left. (The first point of our example hoop is indicated in the above image. After entering the first point, proceed in a counter-clockwise direction around the hoop and enter the remaining points.
The following image displays all of the points of our example hoop typed in the Hoop Shape Definition dialog.
After you enter all points, click the Apply button.
The Hoop Manager will notify you if the shape is invalid. For example, you will receive an error message if your shape does not form a convex polygon (the hoop must be a convex polygon, that is, none of the sides can be dented inward). If you received an error message, check your points to make sure you entered them correctly.
Click OK to close the Hoop Shape Definition dialog.
Your custom hoop with custom hoop shape will now be available in the Hoop Manager (and from the AMAYA OS Hoop Selection menu).
As mentioned above, the Hoop Manager will determines the sew field from the value in the Default Sew Field Margin box (the sew field takes the shape of the defined hoop). If you wish to change the sew field, click the Sew Field Shape button in the Hoop Manager Properties dialog. You will see the following window:
In this window, you can either select a pre-defined sew field shape or create a custom sew field shape. To select a pre-defined sew field shape (based on hoop types), select the type from the Hoop Type menu (e.g., circular in the above image). To specify the sew field size, enter the X Dimension (sew field width), Y Dimension (sew field height) and X and Y Offsets (the vertical and horizontal distances from the sew field center to the hoop center).
You can also enter points to create a custom sew field shape. To do this, use the same procedure used to create a custom hoop shape. (See Custom Hoop Shape for the procedure).
Clicking the Reset to Default Sew Field Value will reset the sew field to the value on the Hoop Manager Properties dialog. (See Default Sew Field Value).
When finished, click Apply. You will receive a message if your sew field is not valid.
Melco offers a Twin Spider Frame Option for use with the AMAYA. If you have purchased this option, click here for installation instructions.
After you have installed the spider frame and spider hoops, you need to select the spider hoop in the AMAYA OS hoop selection menu. Three preset spider hoop configurations are available in AMAYA OS. You must select the configuration that matches the hoops you have installed on your spider hoop frame.
Twin Spider (12cm / 4.7 in.) - two 12cm / 4.7 in. hoops
Twin Spider (15cm / 5.9 in.) - two 15cm / 5.9 in. hoops
Twin Spider (18cm / 7.1 in.) - two 18cm / 7.1 in. hoops
When a spider hoop configuration is selected, both inner hoops will be displayed in the View Window.
You can view the attributes of these preset hoops in the Hoop Manager (Tools->Hoop Manager), but these attributes cannot be changed. You can, however, change the order in which the individual hoops are sewn. You can also change the color sequence used when sewing in each hoop. Click here for instructions
If you would like to use a spider hoop other than the Melco Spider Hoop Option, you can create a user-defined spider hoop in the Hoop Manager. Please note that you must create a spider hoop for each configuration of hoops that you plan to use with the spider hoop (a configuration can only use one hoop size).
To create a user-defined spider hoop, complete the following steps. (A spider frame with six circular holes will be used as an example).
Select Tools->Hoop Manager to open the Hoop Manager.
Click the Add Hoop button. Type the name of your hoop and click OK.
Select a hoop type from the Type pull-down menu. The type reflects the shape of the hoops that will be inserted into the frame. (In our example, circular is chosen).
Enter the X and Y dimensions of the hoops that will be inserted into the frame. (All hoops must be the same size when defining a custom spider hoop). Measure from one side of the outer edge of the hoop to the other side of the outer edge. (In our example, X and Y dimensions of 2 inches have been entered).
If needed, enter the X and Y offsets of the frame (also called the outer hoop). The X and Y offsets are the measured distance from the machine origin (needleplate hole) to the hoop center. It is necessary to enter offsets when the hoop center is not aligned with the needleplate hole. Offsets will align the hoop center to the needleplate hole. (In our example we have no offsets).
Enter the thickness of the hoops that will be inserted into the frame. Measure from the outside edge of the hoop to the inside edge of the hoop. If you do not enter a hoop thickness, the Hoop Manager will use a default thickness of 65 points. (In our example, a thickness of 0.25 inches has been entered).
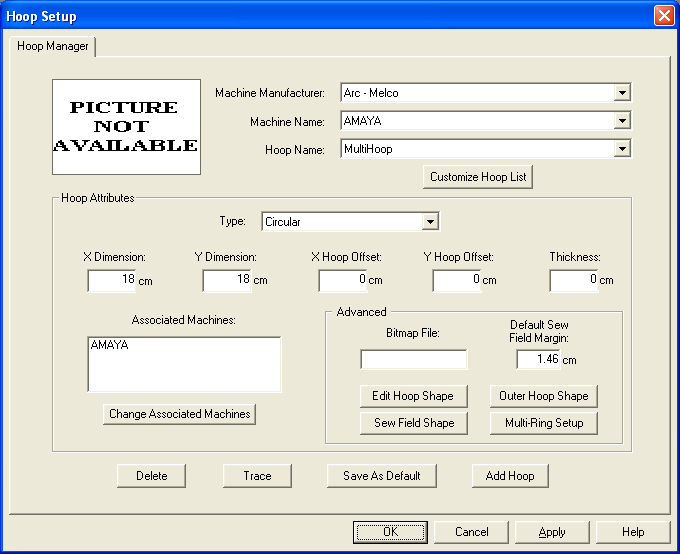
Click the Multi-Ring Setup button. You will see the following dialog.
Select the type of the outer hoop from the Type pull-down menu. (In our example Rectangular has been selected).
Enter the dimensions of the outer hoop- X Size is the width; Y Size is the length/depth. (In our example, an X size of 10 in. and a Y size of 7 in. have been entered).
In the Number of Rings box, enter the number of rings you wish to be available in the configuration. (In our example we have entered 6 because we want to insert six hoops).
In the Rings Offsets area, you will need to enter the offsets for each ring you will be sewing in. Measure from the center of each ring to the center of the spider frame. (See the drawing below).
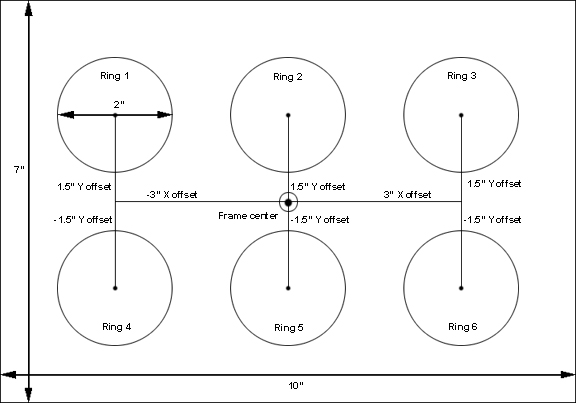
In our example, the rings below the frame center have negative Y offsets of 1.5 inches, and the rings above the frame center have positive Y offsets of 1.5 inches. The rings to the left of the frame center have negative X offsets of 3 inches, and the rings to the right of the frame center have positive X offsets of 3 inches
Click OK to close the Multi-Ring Setup dialog.
|
|
Note: It is possible to create a custom outer hoop shape, custom ring shape, and a custom sew field shape when creating user-defined spider hoops. To create any of these custom shapes, you should follow the Custom Hoop Shape procedure. |